In this post, I'm sharing tips & tricks about managing/maintaining an open-source Zig project and mentioning the commonly used practices. I'm also giving a brief introduction to my first-ever Zig project "linuxwave" which led to the writing of this series.

Recently, I shared my first Zig project called "linuxwave" which is a simple command-line tool for generating music from a (random) stream of data. I will talk about it more at the end of this post.
While writing Zig in the past months, I sometimes had a hard time figuring out what to do or which way to go to efficiently do a certain thing. During those times, I either went for a hunt in the wild interwebs or asked a question in the Discord server of Zig. Unfortunately, there is still a lack of documentation so I turned this getting help process into writing blog posts and sharing my findings. Here are the first 2 parts of this series which came out exactly in the way that I described - me trying to figure out things:
In the meantime, I was working on my project and writing Zig at every chance that I get. I must say, I absolutely enjoyed this process since it's been a while since I learned something low-level like Zig. Actually, it's been a while since I learned a new programming language as well. Development was really fun.
However, like every good thing, this had an end. After the core functionality is there and the Zig code is thoroughly tested, I started to do chores that are more related to project management rather than actual development. Although it is sometimes boring, I still believe that doing grunt tasks is also important since it makes you able to efficiently maintain the project and paves the way for new contributors.
So I will be sharing my experience of project management in Zig to document what could be done to achieve a better stance for your Zig project in the open-source community. This could also be perceived as me trying to apply the same open-source maintenance techniques that I use for my Rust projects to a Zig project.
I will cover the following topics:
So let's jump right into it.
Adding libraries ⚡
For newcomers, this is one of the prominent questions. Currently, there does not seem to be an easy and standard way like cargo add for adding libraries to your Zig project. However, there are some package managers available for this purpose:
- gyro: A Zig package manager with an index, build runner, and build dependencies.
- zigmod: A package manager for the Zig programming language.
- aquila: A package index for Zig projects.
For my project, I followed a more straightforward approach: Git Submodules!
1- Create libs directory at the root of your project.
2- Add the library as a git submodule:
Either run git submodule add <remote_url> libs/<lib> or add .gitmodules file. For example, for zig-clap:
[submodule "libs/zig-clap"]
  path = libs/zig-clap
  url = https://github.com/Hejsil/zig-clap
3- Then you need to add the package to your project in build.zig as follows:
const exe = b.addExecutable("exe_name", "src/main.zig");
// ...
// ...
exe.addPackagePath("clap", "libs/zig-clap/clap.zig")
4- Now you can import the library from your source files like this:
const clap = @import("clap");Hejsil summarizes this very well in this issue:
Right now, there is no standard way to install Zig libraries. There are a few common ways people do it:
git submodule or copying and pasting the library into their own project.
- After this, you can add
exe.addPackagePath("clap", "path/to/clap.zig");to yourbuild.zigfile to use the libraryUse an unofficial package manager such as
zigmodorgyro
- Look at the docs for these package managers for how to install packages using them. They should both be able to install
zig-clapas far as I know.
Running tests ⚡
While writing tests for my project, I realized I need to add tests for each file and specify which files to test in build.zig. For example:
const exe_tests = b.addTest("src/main.zig");
exe_tests.setTarget(target);
exe_tests.setBuildMode(mode);

const test_step = b.step("test", "Run unit tests");
test_step.dependOn(&exe_tests.step);
When I run this code with zig build test, it will only run the tests in main.zig. What I wanted is to run the tests in every file in my project so I did the most obvious thing that comes to mind:
const test_step = b.step("test", "Run tests");

// loop through the modules and add them for testing
for ([_][]const u8{ "main", "wav", "file", "gen" }) |module| {
    const test_module = b.fmt("src/{s}.zig", .{module});
    var exe_tests = b.addTest(test_module);
    test_step.dependOn(&exe_tests.step);
}
$ zig build test
1/1 test.run... OK
All 1 tests passed.
1/2 test.encode WAV... OK
2/2 test.stream out WAV... OK
All 2 tests passed.
1/1 test.read bytes from the file... OK
All 1 tests passed.
1/1 test.generate music... OK
All 1 tests passed.This works just fine but there is also another way (and a better way) of doing this which is mentioned in this Reddit thread.
You need to have a common file that "references" the testing code for them to be run by a single "addTest" statement in your build file. For example, in
src/myLibrary.zig:
pub const A = @import("A.zig");
pub const B = @import("B.zig");
pub const SomeDataType = @import("C.zig").SomeDataType;

test {
  @import("std").testing.refAllDecls(@This());
}
Then in
build.zig, you can simply add it asb.addTest("src/myLibrary.zig").
Code coverage ⚡
One of the cool things you can do is to track how much of your tests cover your code. This also helps with testing the functionality better and potentially eliminating bugs. Sometimes you even need to refactor your code to write tests for a certain function/module which makes the code better at the end of the day.
In Rust projects, I usually follow this path for testing/coverage:
- Write tests
- Run them using cargo-nextest
- Generate code coverage report with a tool
- Upload it to Codecov.io
For Zig, we will do the following:
- Write tests
- Run them using
zig build test - Generate code coverage report with kcov
- Upload it to Codecov.io
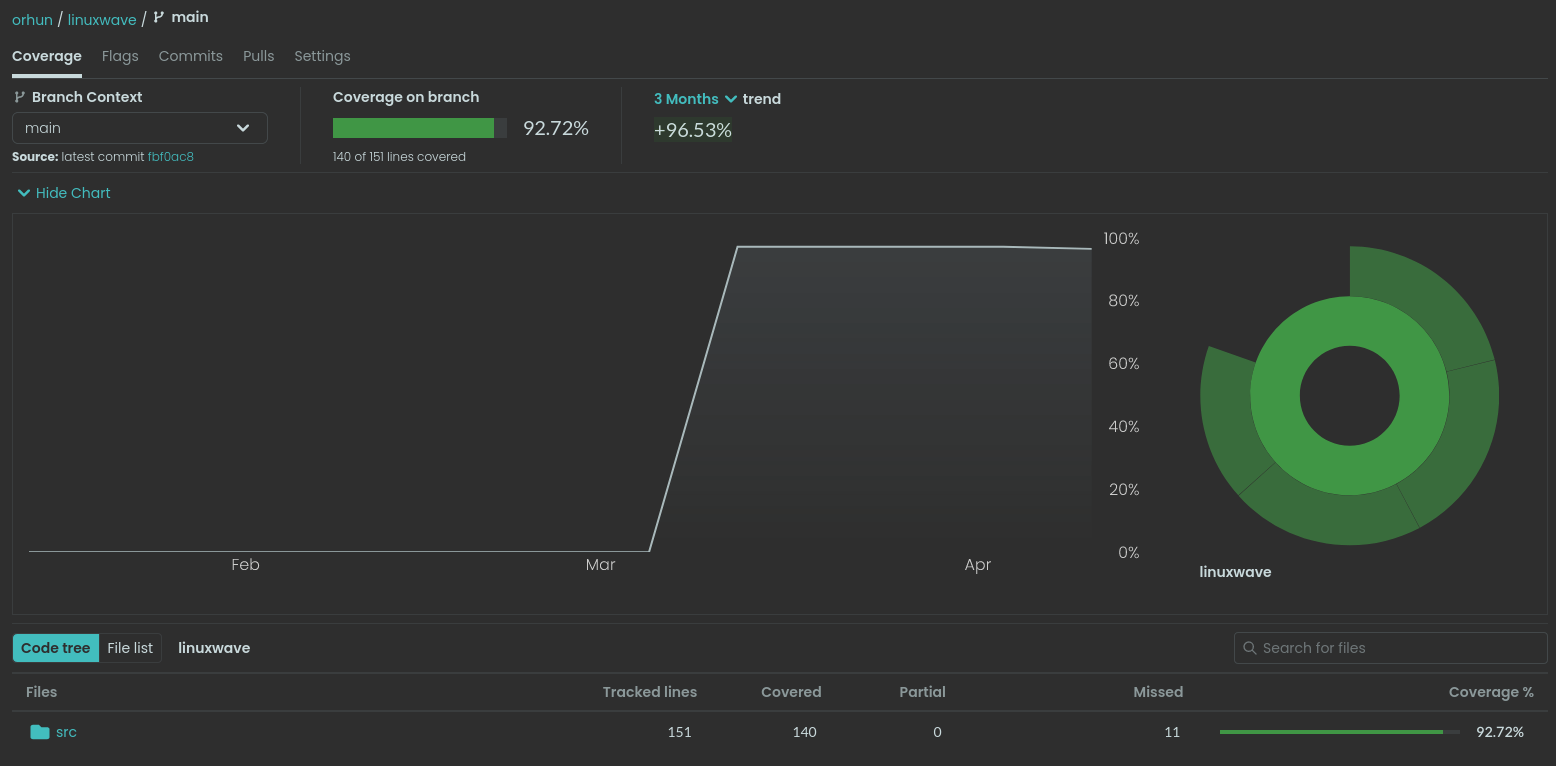
After the tests are passed, the first step is to generate a code coverage report. While researching this topic, I came across this article that tells you how you can do that with kcov.
We simply need to add a new flag in build.zig for generating the coverage report:
const coverage = b.option(bool, "test-coverage", "Generate test coverage") orelse false;

const exe_tests = b.addTest("src/main.zig");
exe_tests.setTarget(target);
exe_tests.setBuildMode(mode);

if (coverage) {
    exe_tests.setExecCmd(&[_]?[]const u8{
        "kcov",
        "kcov-output",
        null,
    });
}
Now when you run zig build test -Dtest-coverage, the report will be generated in kcov-output.
Neat!
The next step is to upload this report to Codecov. I put together a simple GitHub Actions workflow for that purpose:
# contents of .github/workflows/ci.yml

name: Continuous Integration

on:
  push:
    branches:
      - main

jobs:
  test:
    name: Test
    runs-on: ubuntu-latest
    steps:
      - name: Checkout the repository
        uses: actions/checkout@v3
        with:
          # include libraries
          submodules: recursive

      - name: Install Zig
        uses: goto-bus-stop/setup-zig@v2
        with:
          version: 0.10.1

      - name: Install kcov
        run: |
          sudo apt-get update
          sudo apt-get install -y \
            --no-install-recommends \
            --allow-unauthenticated \
            kcov

      - name: Test
        run: zig build test -Dtest-coverage

      - name: Upload coverage to Codecov
        uses: codecov/codecov-action@v3
        with:
          name: code-coverage-report
          directory: kcov-output
          fail_ci_if_error: true
          verbose: true
And here we go: https://app.codecov.io/gh/orhun/linuxwave
Documentation generation ⚡
In Chapter 3 of Ziglearn, the documentation generation is explained in detail:
The Zig compiler comes with automatic documentation generation. This can be invoked by adding
-femit-docsto yourzig build-{exe, lib, obj}orzig runcommand. This documentation is saved into./docs, as a small static website.This generation is experimental, and often fails with complex examples. This is used by the standard library documentation.
So we simply need to activate the emit_docs flag for the auto-generation of the documentation. As a bonus, I recommend adding a flag in build.zig as follows:
const documentation = b.option(bool, "docs", "Generate documentation") orelse false;

const exe = b.addExecutable(exe_name, "src/main.zig");
exe.setTarget(target);
exe.setBuildMode(mode);

if (documentation) {
    exe.emit_docs = .emit;
}
After this, you can generate the documentation via zig build -Ddocs=true.
The generated static site in docs/ looks like this:
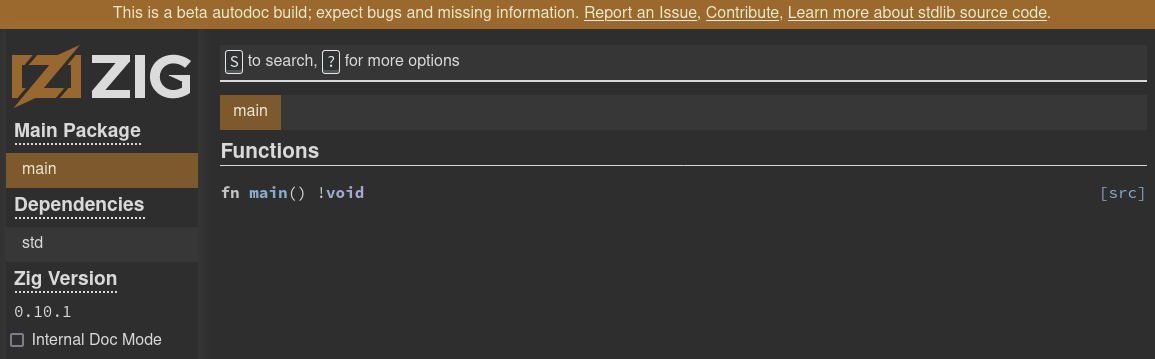
It is cool but I would like to go one step further and deploy this site to GitHub Pages.
I don't find it feasible to maintain the docs/ folder in the repository so I added it to the .gitignore. What I want instead is to auto-generate the documentation and deploy it when I push commits to the main branch.
To do that, you first need to enable GitHub Actions feature for the GitHub Pages:
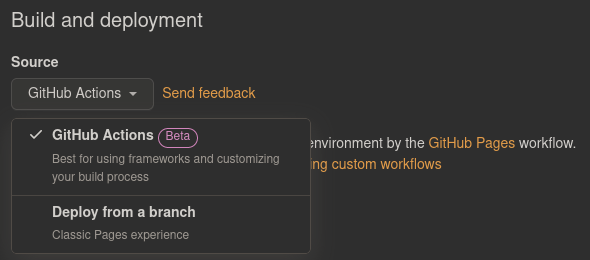
Repository -> Settings -> Pages -> Build and deployment -> Source -> Select GitHub Actions instead of the legacy Deploy from a branch option.
After that, we can simply add the following workflow file for deploying the documentation to the GitHub Pages:
# contents of .github/workflows/pages.yml

name: GitHub Pages

on:
  # Runs on pushes targeting the default branch
  push:
    branches: [main]

  # Allows you to run this workflow manually from the Actions tab
  workflow_dispatch:

# Sets permissions of the GITHUB_TOKEN to allow deployment to GitHub Pages
permissions:
  contents: read
  pages: write
  id-token: write

# Allow one concurrent deployment
concurrency:
  group: "pages"
  cancel-in-progress: true

jobs:
  deploy:
    name: Deploy website
    runs-on: ubuntu-latest
    environment:
      name: github-pages
      url: ${{ steps.deployment.outputs.page_url }}
    steps:
      - name: Checkout the repository
        uses: actions/checkout@v3
        with:
          submodules: recursive

      - name: Install Zig
        uses: goto-bus-stop/setup-zig@v2
        with:
          version: 0.10.1

      - name: Generate documentation
        run: zig build -Ddocs=true

      - name: Setup Pages
        uses: actions/configure-pages@v3
      - name: Upload artifact
        uses: actions/upload-pages-artifact@v1
        with:
          # upload documentation
          path: docs

      - name: Deploy to GitHub Pages
        id: deployment
        uses: actions/deploy-pages@v2
You can check out the deployment under Settings > Pages:
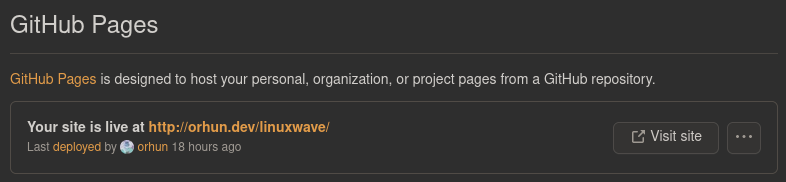
As an example, see the documentation of my project here: https://orhun.dev/linuxwave/docs/
CI/CD ⚡
Lastly, let's set up a CI/CD workflow for our project. There will be 2 workflow files:
ci.yml: for making sure that the project builds fine.- triggered via pushing a commit
cd.yml: for distributing pre-built binaries for different platforms.- triggered via pushing a tag
Continuous Integration
Here is a GitHub Actions workflow file that automates the process of building, testing, and checking the formatting of a project every time there's a push or a pull request to the main branch:
name: Continuous Integration

on:
  pull_request:
  push:
    branches:
      - main

jobs:
  build:
    name: "Build with args: '${{ matrix.OPTIMIZE }}'"
    runs-on: ubuntu-latest
    strategy:
      fail-fast: false
      matrix:
        OPTIMIZE: ["", "-Drelease-safe", "-Drelease-fast", "-Drelease-small"]
    steps:
      - name: Checkout the repository
        uses: actions/checkout@v3
        with:
          submodules: recursive

      - name: Install Zig
        uses: goto-bus-stop/setup-zig@v2
        with:
          version: 0.10.1

      - name: Build
        run: zig build ${{ matrix.OPTIMIZE }}

      - name: Test
        run: zig build test ${{ matrix.OPTIMIZE }}

      - name: Check formatting
        run: zig fmt --check .
The binary is tested for 3 different optimization profiles:
- ReleaseFast
- Fast runtime performance
- Safety checks disabled
- Slow compilation speed
- Large binary size
- ReleaseSafe
- Medium runtime performance
- Safety checks enabled
- Slow compilation speed
- Large binary size
- ReleaseSmall
- Medium runtime performance
- Safety checks disabled
- Slow compilation speed
- Small binary size
Continuous Deployment
Here is a GitHub Actions workflow file that automates the process of building a binary for a specific target and publishing it on GitHub every time there is a new version tag pushed to the repository:
name: Continuous Deployment

on:
  push:
    tags:
      - "v*.*.*"

jobs:
  publish-github:
    name: Publish on GitHub
    runs-on: ubuntu-latest
    strategy:
      fail-fast: false
      matrix:
        TARGET:
          [
            x86_64-linux,
            x86_64-macos,
            x86_64-windows,
            aarch64-linux,
            aarch64-macos,
            aarch64-windows,
            arm-linux,
            riscv64-linux,
            i386-linux,
          ]

    steps:
      - name: Checkout the repository
        uses: actions/checkout@v3
        with:
          submodules: recursive

      - name: Set the release version
        run: echo "RELEASE_VERSION=${GITHUB_REF:11}" >> $GITHUB_ENV

      - name: Install Zig
        uses: goto-bus-stop/setup-zig@v2
        with:
          version: 0.10.1

      - name: Build
        run: zig build -Drelease-safe -Dtarget=${{ matrix.TARGET }}

      - name: Upload the binary
        uses: svenstaro/upload-release-action@v2
        with:
          file: zig-out/bin/binary-${{ env.RELEASE_VERSION }}-${{ matrix.TARGET }}*
          file_glob: true
          overwrite: true
          tag: ${{ github.ref }}
          repo_token: ${{ secrets.GITHUB_TOKEN }}
As you can see here, it is really easy to cross-compile Zig projects by only providing the -Dtarget option.
TARGET variable in this workflow consists of 2 parts:
- CPU architecture (e.g.
x86_64) - Operating system (e.g.
linux)
You can get more information about cross compilation here.
linuxwave 🐧🎵
It is time for the main event.

linuxwave is a command-line tool written in Zig for generating music from the entropy of the Linux kernel (/dev/urandom). It can also encode WAV files as a music composition from a given input file.
Here are some examples:
- Use A minor blues scale:
linuxwave -s 0,3,5,6,7,10 -n 220 -o blues.wav- Read from an arbitrary file and turn it into a 10-second music composition:
linuxwave -i build.zig -n 261.63 -d 10 -o music.wav- Generate a calming music:
linuxwave -r 2000 -f S32_LE -o calm.wav- Generate a chiptune music:
linuxwave -r 44100 -f U8 -c 2 -o chiptune.wavMore examples/presets are available in the repository.
✨ It is up to your imagination to generate fancy stuff!
⚡ GitHub: https://github.com/orhun/linuxwave
Conclusion

Before anyone comments about the title of this post, I must admit that we didn't actually master the project management in Zig completely (yet). But that was the most fitting title that ChatGPT suggested based on my bullet points so I decided to roll with it.
I believe I covered a couple of important techniques and best practices for efficiently managing open-source Zig projects. I might share more stuff about this topic in the future and feel free to let me know if you have additional tips or any questions!
I hope you enjoy the stuff you generate with linuxwave! Feel free to share them here.
Here is the next post of the Zig Bits series! ("Building an HTTP client/server from scratch")
sayonara!