Let's experiment with the std.http module of Zig >=0.11 and create an HTTP server/client from scratch (along with some benchmarks)!

Note: The standard library has changed since the writing of this article. Updated source code for the HTTP server portion can be found at the end of this article.
While learning a new programming language, one of the things that is always on my mind is if it is possible/easy to write an HTTP server/client with it. It might be due to the nature of my industrial orientation as a backend/systems engineer, or it is because the networking-related implementations were always a bit scary to me. In time, I think I overcame this fear quite a bit, thanks to the well-documented and beginner-friendly HTTP server/client libraries in Rust. To give some names and a kind shout-out to the maintainers: reqwest, ureq and hyper are very pleasant to work with in that regard. They just do the job, and I appreciate it when things work out of the box without too much trouble.
But now, we are in the Ziguana territory. Ever since I started writing Zig for creating small programs and writing this series, I have been wondering how high-level I can get with such a low-level systems language. Today, I'm hoping to answer that question.
Q: So, what is the plan?
A: I heard that the Zig standard library will have some exciting HTTP features starting from 0.11.0. As a first step, let's experiment with the new stuff™ and try to come up with something functional. Also, I'm curious about the performance/speed aspect of things. For that, I will be creating some benchmarks to see the comparison with other programming languages such as Rust.
Q: Aight, so we goin' full nerd mode?
A: I'm a teapot.
Looking into std.http ⚡

Zig finally got the built-in HTTP server/client support in the past months:
- Coming Soon to a Zig Near You: HTTP Client (technical overview)
- HTTP server in the standard library (tracking issue)
- Zig now has built-in HTTP server and client in std (HN discussion)
To summarize the features of this newly added std.http module:
- Only available in Zig
0.11.0-dev.2675-0eebc2588and above. - Supports
HTTP/1.1(however, see A barely HTTP/2 server in Zig for an interesting read!) - Supports features such as connection pooling, compressed content, proxying and TLS.
And I think the most exciting part is:
With a fresh install of Zig, we can fetch the contents of a website or send a POST request with no extra hassle of finding an extra library to provide those features for us.
Q: It is cool and all, but is it easy to use? Show me the code already.
A: Slown, let's take a look at the available types and methods in std.http first.
At the time of writing this blog post, std.http has the following API:
Client: HTTP client implementation.Server: HTTP server implementation.Connection: Connection type (keep_alive,close)ContentEncoding: Content encoding options (compress,deflate,gzipandzstd)Field: Common type fornameandvalueHeaders: HTTP headersMethod: HTTP methods such asGETandPOSTStatus: HTTP status codes (not_found = 404,teapot = 418, etc.)TransferEncoding: Form of encoding used to transfer the body (chunked)Version: CurrentlyHTTP/1.0andHTTP/1.1
As you can already tell, it is a very straightforward HTTP implementation, and you might even figure out the usage just by looking at the available types (if you have magical powers or something). Compared to the current stable version of Zig (0.10.1), std.http is not that barebones and got some cool additions such as content/transfer encodings and headers, which is very cool!
Q: Enough fiddling around man, are you going to write the code now?
A: Uh, yeah. Let's do that before you throw a hissy fit.
Q: I would nev--
Building an HTTP client ⚡

I will be assuming that you have Zig
0.11.0installed!
Before everything, we need to choose an allocator to use. This is one of the fun aspects of Zig where you get to choose exactly how the memory allocations are done. I highly recommend reading about allocators or the previous episodes of these series where I weigh on this topic.
For the sake of simplicity, let's go with std.heap.GeneralPurposeAllocator which is a safe allocator which can prevent double-free, use-after-free, and can detect leaks.
const std = @import("std");

// Create an allocator.
var gpa = std.heap.GeneralPurposeAllocator(.{}){};
defer std.debug.assert(gpa.deinit() == .ok);
const allocator = gpa.allocator();
As the next step, let's create our Client object. It is fairly straightforward:
const http = std.http;

// Create an HTTP client.
var client = http.Client{ .allocator = allocator };
defer client.deinit();
As you can see, the only parameter that is needed to create a Client is the allocator. Optionally, you can provide a certificate bundle, connection pool, and proxy during construction.
Another thing to note here is the defer keyword. It instructs that the deinit method will be called when the client goes out of scope which means all the associated resources with the client will be released. For more information, you can give it a read to the part 0x2 of this series.
Okay, now let's make a GET call to a website and get the result as text.
Q: Any brilliant ideas about which site to use?
A: You bet!
https://whatthecommit.com: commit message generator
I also use this website in a git alias as follows:
[alias]
  yolo = !git commit -m \"$(curl -s https://whatthecommit.com/index.txt)\"
So when I need a dummy commit, I just go:
$ git yolo

[master b989274] This will definitely break in 2087 (TODO)
Such a fun command!
Q: Ahem, aren't you derailing from the topic?
A: Ah, yeah, sorry.
To send a request, we will need a few things:
- a
std.http.Method - a
std.Uri- parsed from an URL.
- a
std.http.Headers- for holding the headers sent to the server.
- it will only allocate memory if we append anything to it.
And here is how we can put these parameters together:
// Parse the URI.
const uri = std.Uri.parse("https://whatthecommit.com") catch unreachable;

// Create the headers that will be sent to the server.
var headers = std.http.Headers{ .allocator = allocator };
defer headers.deinit();

// Accept anything.
try headers.append("accept", "*/*");
Now, we are ready to create a Request object:
// Create a request.
var request = try client.request(.GET, uri, headers, .{});
defer request.deinit();
And that's it!
Q: That's it what? I don't see anything happening.
A: You're right. We only formed a connection to the server now. To actually send the request, we need to use the start function as follows:
// Send the request and headers to the server.
try request.start();Q: Oh god, I hate extra steps!
A: Think about it in a different way, this approach comes in handy when you need to manipulate the request before sending it. For example,
var request = try client.request(.POST, uri, headers, .{});
defer request.deinit();

// Set the encoding for the POST request.
request.transfer_encoding = .chunked;

try request.start();Q: Oooh, that makes sense.
A: Well, if you hate extra steps, we have one other step to go.
Q: Geez, what now!?
After sending the request, we need to wait for server to send us a response:
// Wait for response.
try request.wait();
This wait call will handle the following tasks for us:
- Redirects
- Reading/storing headers
- Setting up decompression
Lastly, to read the response from the server, we can use the reader() method of Request and get a std.io.Reader. The rest is simply reading from a stream in Zig:
// Read the entire response body, but only allow it to allocate 8KB of memory.
const body = request.reader().readAllAlloc(allocator, 8192) catch unreachable;
defer allocator.free(body);
And here is how it is all put together with printing out the response:
// Zig version: 0.11.0

const std = @import("std");
const http = std.http;

pub fn main() !void {
    // Create an allocator.
    var gpa = std.heap.GeneralPurposeAllocator(.{}){};
    defer std.debug.assert(gpa.deinit() == .ok);
    const allocator = gpa.allocator();

    // Create an HTTP client.
    var client = http.Client{ .allocator = allocator };
    // Release all associated resources with the client.
    defer client.deinit();

    // Parse the URI.
    const uri = std.Uri.parse("https://whatthecommit.com/index.txt") catch unreachable;

    // Create the headers that will be sent to the server.
    var headers = std.http.Headers{ .allocator = allocator };
    defer headers.deinit();

    // Accept anything.
    try headers.append("accept", "*/*");

    // Make the connection to the server.
    var request = try client.request(.GET, uri, headers, .{});
    defer request.deinit();

    // Send the request and headers to the server.
    try request.start();

    // Wait for the server to send use a response.
    try request.wait();

    // Read the entire response body, but only allow it to allocate 8KB of memory.
    const body = request.reader().readAllAlloc(allocator, 8192) catch unreachable;
    defer allocator.free(body);

    // Print out the response.
    std.log.info("{s}", .{body});
}
Let's run it!
$ zig build run
error: TlsInitializationFailed
std/crypto/tls/Client.zig:257:17: 0x35cb35 in init__anon_9759 (std.http)
                return error.TlsUnexpectedMessage;
                ^
std/http/Client.zig:913:103: 0x2a208b in connectUnproxied (std.http)
            conn.data.tls_client.* = std.crypto.tls.Client.init(stream, client.ca_bundle, host) catch return error.TlsInitializationFailed;
                                                                                                      ^
std/http/Client.zig:948:9: 0x26f6a1 in connect (std.http)
        return client.connectUnproxied(host, port, protocol);
        ^
std/http/Client.zig:1013:44: 0x2678f8 in request (std.http)
    const conn = options.connection orelse try client.connect(host, port, protocol);
                                           ^
src/main.zig:25:19: 0x266f2f in main (std.http)
    var request = try client.request(.GET, uri, headers, .{});
                  ^
Build Summary: 3/5 steps succeeded; 1 failed (disable with --summary none)
run transitive failure
└─ run std.http failureQ: Oops, what happened?
A: Uhhhh...
With a little bit of digging, I found an issue in the Zig repository:
https://github.com/ziglang/zig/issues/14172 (test std lib TLS implementation against many real world servers)
It turns out, current TLS implementation in the standard library only supports TLS 1.3.
Here are some comments regarding this:
-
@dadrian: I assume the decision to only support 1.3 is at least semi-intentional, since 1.3 and 1.2 have different state machines.
-
@jedisct1: Eventually, everybody's gonna move to TLS 1.3. I'm not sure that it's worth investing time in a TLS 1.2 implementation today, especially since TLS 1.2 has a lot of footguns.
And unfortunately, our beloved website whatthecommit.com uses TLS 1.2:
$ curl -v https://whatthecommit.com/index.txt

* TLSv1.3 (IN), TLS handshake, Server hello (2):
* TLSv1.2 (IN), TLS handshake, Certificate (11):
* TLSv1.2 (IN), TLS handshake, Server key exchange (12):
* TLSv1.2 (IN), TLS handshake, Server finished (14):
* TLSv1.2 (OUT), TLS handshake, Client key exchange (16):
* TLSv1.2 (OUT), TLS change cipher, Change cipher spec (1):
* TLSv1.2 (OUT), TLS handshake, Finished (20):
* TLSv1.2 (IN), TLS handshake, Finished (20):

* SSL connection using TLSv1.2 / ECDHE-RSA-AES128-GCM-SHA256
Also, we can check the TLS 1.3 support by running:
$ curl -v --tlsv1.3 https://whatthecommit.com/index.txt

*   Trying 3.141.206.122:443...
* Connected to whatthecommit.com (3.141.206.122) port 443 (#0)
* ALPN: offers h2,http/1.1
* TLSv1.3 (OUT), TLS handshake, Client hello (1):
*  CAfile: /etc/ssl/certs/ca-certificates.crt
*  CApath: none
* TLSv1.3 (IN), TLS alert, close notify (256):
* OpenSSL SSL_connect: SSL_ERROR_ZERO_RETURN in connection to whatthecommit.com:443
* Closing connection 0

curl: (35) OpenSSL SSL_connect: SSL_ERROR_ZERO_RETURN in connection to whatthecommit.com:443
RIP.
Q: So, what do we do now?
A: Luckily I have set up a similar website in the past which can be used for testing in our case (and it supports TLS 1.3).
https://godsays.xyz: random text generator
It is simply a website that spits out random sequence of words from a predefined wordlist every time you refresh it. What, you ask why this exists?
Terrence Andrew Davis (December 15, 1969 – August 11, 2018) was an American programmer who created and designed the operating system TempleOS alone. It was a highly complex and unusual undertaking for one person, as the project extended to building core components such as programming language, editor, compiler and kernel virtually from scratch.
Contained in Terry's TempleOS masterpiece were various random text generators. Terry believed that by generating this text one could "speak to God".
So I reproduced this logic in Rust and created a simple CLI program (godsays) and a webserver (godsays-server) for extended use cases.
Repository: https://github.com/orhun/godsays
So we can simply update the URL in our program and try running it again as follows:
$ sed -i "s|https://.*\"|https://godsays.xyz\"|g" src/main.zig

$ zig build run
info: "don't push it try again act SupremerCourt guppy but of course smack some sense into you ..."
Yay, it worked! We successfully sent a GET request to a server and printed out the response.
Q: What about POST requests?
A: Good question. Right after we send the request, we can write to it as follows:
// Make the connection to the server.
var request = try client.request(.POST, uri, headers, .{});
defer request.deinit();
request.transfer_encoding = .chunked;

// Send the request and headers to the server.
try request.start();

// Send the payload.
try request.writer().writeAll("Zig Bits!\n");
try request.finish();

// Wait for the server to send use a response.
try request.wait();
And that concludes the HTTP client part, what an adventure!
Bonus: git-yolo ⚡
Here is the semi-real-world application where I used the HTTP client from the Zig standard library to fetch a random commit message from whatthecommit.com (let's assume it works) and run the git-commit command for creating dummy commits with a random message.
// Zig version: 0.11.0

const std = @import("std");
const http = std.http;

// URL for fetching a random message.
const RANDOM_MESSAGE_URL = "https://whatthecommit.com/index.txt";

/// Returns a random message.
fn getRandomMessage(allocator: std.mem.Allocator) ![]u8 {
    // Create an HTTP client.
    var client = http.Client{ .allocator = allocator };
    // Release all associated resources with the client.
    defer client.deinit();
    // Parse the URI.
    const uri = try std.Uri.parse(RANDOM_MESSAGE_URL);
    // Create the headers that will be sent to the server.
    var headers = std.http.Headers{ .allocator = allocator };
    defer headers.deinit();
    // Accept anything.
    try headers.append("accept", "*/*");
    // Make the connection to the server.
    var request = try client.request(.GET, uri, headers, .{});
    defer request.deinit();
    // Send the request and headers to the server.
    try request.start();
    // Wait for the server to send use a response.
    try request.wait();
    // Return the body.
    return try request.reader().readAllAlloc(allocator, 8192);
}

/// Executes the `git commit` command with the given message parameter.
fn commit(allocator: std.mem.Allocator, message: []const u8) !void {
    var process = std.ChildProcess.init(&[_][]const u8{
        "git",
        "commit",
        "-m",
        message,
    }, allocator);
    try process.spawn();
}

/// Entry-point of the application.
pub fn main() !void {
    // Create an allocator.
    var gpa = std.heap.GeneralPurposeAllocator(.{}){};
    const allocator = gpa.allocator();
    // Get a random message.
    var message = try getRandomMessage(allocator);
    defer allocator.free(message);
    // Create a git commit.
    try commit(allocator, message);
}
Building an HTTP server ⚡
Now that the easy part is done, let's get to the real deal: the HTTP server.
For the following implementation, I took some inspiration from the tests in the standard library and came up with a simplified version of it without multithreading and assertions. But don't worry, we will build something functional and easily extensible for different use-cases.
To keep it simple, I think adding a single route as /get is enough. And why not return "Zig Bits!" from it?
So, here is what we simply want:
$ curl 127.0.0.1:8000/get

Zig Bits!Q: Did you know that you can create an HTTP server in Python in a single line? Try python -m http.server 8000.
A: Don't care + didn't ask + L + Ratio
Let's quickly define our constants for the server configuration:
const std = @import("std");
const http = std.http;
const log = std.log.scoped(.server);

const server_addr = "127.0.0.1";
const server_port = 8000;
One thing to note here is that we specified a scope for the log module so the log messages will appear as info(server), debug(server), etc. which is quite useful if you decide to implement other logging scopes one day.
Next, we need to choose an allocator to use (as we did the same with the HTTP client). I would like to go with std.heap.GeneralPurposeAllocator once again for consistency with the HTTP client example.
// Create an allocator.
var gpa = std.heap.GeneralPurposeAllocator(.{}){};
defer std.debug.assert(gpa.deinit() == .ok);
const allocator = gpa.allocator();
Great, now it is the time to construct our Server object and instruct that the resources will be freed when it goes out of scope.
// Initialize the server.
var server = http.Server.init(allocator, .{ .reuse_address = true });
defer server.deinit();
To bind the server to the address we have defined before:
// Log the server address and port.
log.info("Server is running at {s}:{d}", .{ server_addr, server_port });

// Parse the server address.
const address = std.net.Address.parseIp(server_addr, server_port) catch unreachable;
try server.listen(address);Q: This is going scaringly easy and straightforward. Hmm, what are the next steps?
A: Yeah, as you can see Zig is pretty easy at times. Now, we will define 2 functions to run the server and handle the requests.
Q: Fu-
As in every HTTP server implementation, we need a mechanism to block the current thread, wait for the next request and handle it. To do that in Zig, we will do the following:
acceptmethod ofServerreturns aResponse.Responsecontains useful information such as request method and headers.Responsealso has helper methods for working with the requests. For example,waitmethod can be used to wait for client to complete the request head.
When we put it all together, the server runner function looks like this:
// Run the server and handle incoming requests.
fn runServer(server: *http.Server, allocator: std.mem.Allocator) !void {
    outer: while (true) {
        // Accept incoming connection.
        var response = try server.accept(.{
            .allocator = allocator,
        });
        defer response.deinit();

        while (response.reset() != .closing) {
            // Handle errors during request processing.
            response.wait() catch |err| switch (err) {
                error.HttpHeadersInvalid => continue :outer,
                error.EndOfStream => continue,
                else => return err,
            };

            // Process the request.
            try handleRequest(&response, allocator);
        }
    }
}
Here, we first create an infinite loop for accepting the incoming connections. Then there is another loop constructed for reading the response from a stream with the wait method. Also, the infinite loop is marked as outer to skip the response from the reader loop if the headers are invalid.
As you can see, the request is processed as the last step in the server loop via handleRequest function.
This is where the actual magic happens:
// Handle an individual request.
fn handleRequest(response: *http.Server.Response, allocator: std.mem.Allocator) !void {
    // Log the request details.
    log.info("{s} {s} {s}", .{ @tagName(response.request.method), @tagName(response.request.version), response.request.target });

    // Read the request body.
    const body = try response.reader().readAllAlloc(allocator, 8192);
    defer allocator.free(body);

    // Set "connection" header to "keep-alive" if present in request headers.
    if (response.request.headers.contains("connection")) {
        try response.headers.append("connection", "keep-alive");
    }

    // Check if the request target starts with "/get".
    if (std.mem.startsWith(u8, response.request.target, "/get")) {
        // Check if the request target contains "?chunked".
        if (std.mem.indexOf(u8, response.request.target, "?chunked") != null) {
            response.transfer_encoding = .chunked;
        } else {
            response.transfer_encoding = .{ .content_length = 10 };
        }

        // Set "content-type" header to "text/plain".
        try response.headers.append("content-type", "text/plain");

        // Write the response body.
        try response.do();
        if (response.request.method != .HEAD) {
            try response.writeAll("Zig ");
            try response.writeAll("Bits!\n");
            try response.finish();
        }
    } else {
        // Set the response status to 404 (not found).
        response.status = .not_found;
        try response.do();
    }
}
Let's break it down:
- First, the details of the incoming request are logged.
- Request body is being read and the memory is allocated respectfully (max 8KBs).
Connectionheader is set if necessary.- If the request target is starting with
/get, then write "Zig Bits!" to the response body and return it with "text/plain"Content-Typeheader.- Enable the chunked encoding if the target contains
?chunked, use a fixed content length otherwise.
- Enable the chunked encoding if the target contains
- Return 404 if the request is not matched i.e. route is not configured.
One little detail to give attention to is the difference between the finish() and do() methods of the Response. do() method simply sends the response headers, whereas finish() will send the final chunk for chunked messages or verify that we upheld our agreement to send a certain number of bytes. So if we are sending data, we should always finish off the response by calling finish().
Now that the requests are handled and we have our server functions, here is how we run the server and log the errors:
// Run the server.
runServer(&server, allocator) catch |err| {
    // Handle server errors.
    log.err("server error: {}\n", .{err});
    if (@errorReturnTrace()) |trace| {
        std.debug.dumpStackTrace(trace.*);
    }
    std.os.exit(1);
};
Final HTTP server code:
// Zig version: 0.11.0

const std = @import("std");
const http = std.http;
const log = std.log.scoped(.server);

const server_addr = "127.0.0.1";
const server_port = 8000;

// Run the server and handle incoming requests.
fn runServer(server: *http.Server, allocator: std.mem.Allocator) !void {
    outer: while (true) {
        // Accept incoming connection.
        var response = try server.accept(.{
            .allocator = allocator,
        });
        defer response.deinit();

        while (response.reset() != .closing) {
            // Handle errors during request processing.
            response.wait() catch |err| switch (err) {
                error.HttpHeadersInvalid => continue :outer,
                error.EndOfStream => continue,
                else => return err,
            };

            // Process the request.
            try handleRequest(&response, allocator);
        }
    }
}

// Handle an individual request.
fn handleRequest(response: *http.Server.Response, allocator: std.mem.Allocator) !void {
    // Log the request details.
    log.info("{s} {s} {s}", .{ @tagName(response.request.method), @tagName(response.request.version), response.request.target });

    // Read the request body.
    const body = try response.reader().readAllAlloc(allocator, 8192);
    defer allocator.free(body);

    // Set "connection" header to "keep-alive" if present in request headers.
    if (response.request.headers.contains("connection")) {
        try response.headers.append("connection", "keep-alive");
    }

    // Check if the request target starts with "/get".
    if (std.mem.startsWith(u8, response.request.target, "/get")) {
        // Check if the request target contains "?chunked".
        if (std.mem.indexOf(u8, response.request.target, "?chunked") != null) {
            response.transfer_encoding = .chunked;
        } else {
            response.transfer_encoding = .{ .content_length = 10 };
        }

        // Set "content-type" header to "text/plain".
        try response.headers.append("content-type", "text/plain");

        // Write the response body.
        try response.do();
        if (response.request.method != .HEAD) {
            try response.writeAll("Zig ");
            try response.writeAll("Bits!\n");
            try response.finish();
        }
    } else {
        // Set the response status to 404 (not found).
        response.status = .not_found;
        try response.do();
    }
}

pub fn main() !void {
    // Create an allocator.
    var gpa = std.heap.GeneralPurposeAllocator(.{}){};
    defer std.debug.assert(gpa.deinit() == .ok);
    const allocator = gpa.allocator();

    // Initialize the server.
    var server = http.Server.init(allocator, .{ .reuse_address = true });
    defer server.deinit();

    // Log the server address and port.
    log.info("Server is running at {s}:{d}", .{ server_addr, server_port });

    // Parse the server address.
    const address = std.net.Address.parseIp(server_addr, server_port) catch unreachable;
    try server.listen(address);

    // Run the server.
    runServer(&server, allocator) catch |err| {
        // Handle server errors.
        log.err("server error: {}\n", .{err});
        if (@errorReturnTrace()) |trace| {
            std.debug.dumpStackTrace(trace.*);
        }
        std.os.exit(1);
    };
}
Let's run it!
$ zig build run

info(server): Server is running at 127.0.0.1:8000
info(server): GET HTTP/1.1 /get
info(server): GET HTTP/1.1 /get?chunked
On another terminal:
$ curl 127.0.0.1:8000/get
Zig Bits!

$ curl 127.0.0.1:8000/get?chunked
Zig Bits!
Neat, now we have a functional HTTP server written purely in Zig!
Benchmarks ⚡

For seeing the speed of the Zig HTTP client compared to implementations in other programming languages, I created some benchmarks using hyperfine.
The benchmarks can be found in this repo: https://github.com/orhun/zig-http-benchmarks
Currently, I'm comparing the HTTP client against:
- Rust HTTP client (hyper, reqwest, ureq, attohttpc)
- Go HTTP client (
net/http) - Python HTTP client (
requests) - curl
The way it works is I run the Zig HTTP server and accept N number of requests from different clients and let the hyperfine do its magic.
To run the benchmarks, simply run ./bench.sh:
rust-ureq ran
    1.18 ± 0.22 times faster than rust-hyper
    1.30 ± 0.27 times faster than rust-reqwest
    1.74 ± 0.38 times faster than go-http-client
    1.92 ± 0.40 times faster than rust-attohttpc
    2.17 ± 0.63 times faster than zig-http-client
    4.25 ± 0.73 times faster than curl
10.31 ± 1.47 times faster than python-http-client| Command | Mean [ms] | Min [ms] | Max [ms] | Relative |
|---|---|---|---|---|
curl | 295.2 ± 29.3 | 248.6 | 367.9 | 4.25 ± 0.73 |
zig-http-client | 150.9 ± 38.1 | 98.5 | 250.2 | 2.17 ± 0.63 |
rust-attohttpc | 133.4 ± 20.6 | 101.1 | 174.7 | 1.92 ± 0.40 |
rust-hyper | 82.1 ± 10.1 | 65.7 | 106.0 | 1.18 ± 0.22 |
rust-reqwest | 90.0 ± 14.0 | 67.8 | 126.0 | 1.30 ± 0.27 |
rust-ureq | 69.5 ± 9.6 | 55.3 | 92.9 | 1.00 |
go-http-client | 120.8 ± 20.0 | 84.6 | 171.6 | 1.74 ± 0.38 |
python-http-client | 716.5 ± 22.0 | 665.9 | 765.7 | 10.31 ± 1.47 |
Here is the whisker plot:
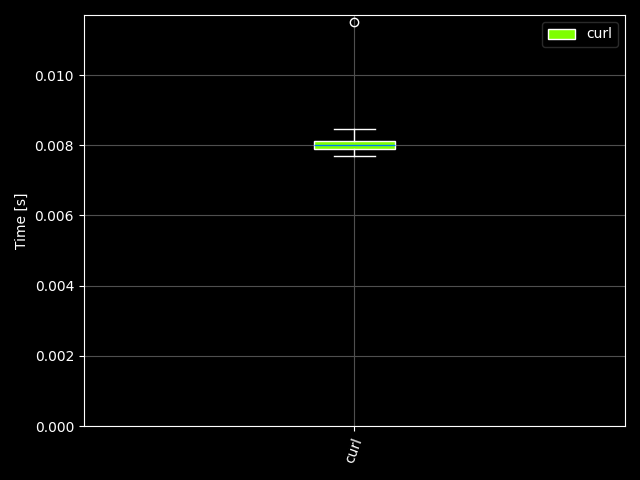
Thanks to @dnaka91 & @truemedian for helping to make the comparison more fair!
Conclusion ⚡

I am still a beginner to Zig and learning new things as I experiment, so any comments about improving the code in any way is highly appreciated. Alternatively, you can send PRs to this repository for editing this blog post.
On the other hand, let me know if you have any interesting ideas for the benchmarks. All the code is available here.
Hope you enjoyed the read, feel free to submit a comment below! Let me know what you think and what might be the topic for the next Zig Bits! ⚡
viszontlátásra!
Update ⚡
On Feb 23, 2024, commit 6395ba8 (fittingly named "std.http.Server: rework the API entirely") reworked the std.http.Server API entirely. Here is a new (basic) implementation that takes into account the new design:
// Zig version 0.14.0
const std = @import("std");
const net = std.net;
const http = std.http;

pub fn main() !void {
    const addr = net.Address.parseIp4("127.0.0.1", 9090) catch | err | {
        std.debug.print("An error occurred while resolving the IP address: {}\n", .{err});
        return;
    };

    var server = try addr.listen(.{});

    start_server(&server);
}

fn start_server(server: *net.Server) void {
    while(true){
        var connection = server.accept() catch |err| {
            std.debug.print("Connection to client interrupted: {}\n", .{err});
            continue;
        };
        defer connection.stream.close();

        var read_buffer : [1024]u8 = undefined;
        var http_server = http.Server.init(connection, &read_buffer);

        var request = http_server.receiveHead() catch |err| {
            std.debug.print("Could not read head: {}\n", .{err});
            continue;
        };
        handle_request(&request) catch |err| {
            std.debug.print("Could not handle request: {}", .{err});
            continue;
        };
    }
}

fn handle_request(request: *http.Server.Request) !void {
    std.debug.print("Handling request for {s}\n", .{ request.head.target });
    try request.respond("Hello http!\n", .{});
}