Recently I packaged my project git-cliff (changelog generator written in Rust) for NPM with the help of my friend @atlj. I thought this would be an interesting topic for a blog post since it has a certain technical depth about distributing binaries and frankly it still amazes me how the whole thing works so smoothly. So let's create a simple Rust project, package it for NPM and fully automate the release process via GitHub Actions.
Q: Wait, what? I thought NPM was just for Javascript stuff!?
A: Actually, no. As long as you have the correct set of tools for executing a binary and packaging it, you're set. It doesn't necessarily need to be a Rust package as well, you can package anything and do anything when the package is installed/executed. That's why NPM is so dangerous! - a topic for another blog post.
Q: Okay, I see. But... why do this? Can't you just download the binary and run it?
A: As an answer to this question, I would like to outline my conversation with @atlj. Please note that it's not the actual conversation and we do not talk like that. Or maybe we do. Anyways, here it is:
atlj: Yo orhun, let's package git-cliff for NPM so that it will be more accessible to frontend devs and npx is very convenient for installing/running stuff.
orhun: Sounds good. But how do we do it?
atlj: Check this sh*t out: lefthook (GitHub) & lefthook (NPM)
orhun: Oh, it's a Go project and they have an NPM package. WTF!
atlj: Yeah, we can do the same. Or even better.
orhun: I'm down.
So the inspiration came from lefthook and we wanted to see how we can take this approach and apply it to git-cliff.
It worked flawlessly! Just run:
npx git-cliff@latestQ: Show me how.
A: Follow me. 🐇
NPM
First of all, let's understand what NPM is and how the NPM registry works.
NPM (originally short for "Node Package Manager") is the default package manager for the Javascript runtime environment Node.js. It consists of a command line client (npm) and an online database of public and paid-for private packages, called the NPM registry. This is where we will push our packages.
The packages in the NPM registry are in CommonJS format and include a metadata file in JSON format (package.json). The registry does not have any vetting process for submission, which means that packages found there can potentially be low quality, insecure, or malicious. NPM relies on user reports to take down such packages. You can manually check your package to find insecure dependencies by running npm audit.
To install a package or the dependencies specified by a package, you can run npm install. On the other hand, npx can be used to run an arbitrary command from an NPM package which is either installed locally or fetched remotely. It handles both installation and execution. In that sense, we can think of it as a shortcut for npm install & npm run.
At the end of this blog post, we're aiming to install/run our application with npx <app>.
Overview
Let me make it clear that we won't be compiling our Rust application into WASM for packaging it for the NPM registry. That's a wasm-pack task on its own. You can read more about this approach here and here.
Instead, we will be distributing binaries that are built for different targets (i.e. architectures/platforms). Each NPM package will be responsible for wrapping the target-specific binary and there will be a "base" package that is exposed to the end user. This is why this packaging approach is more portable since you only need to compile binaries for different architectures and place the binaries inside NPM packages.
Let's break it down:
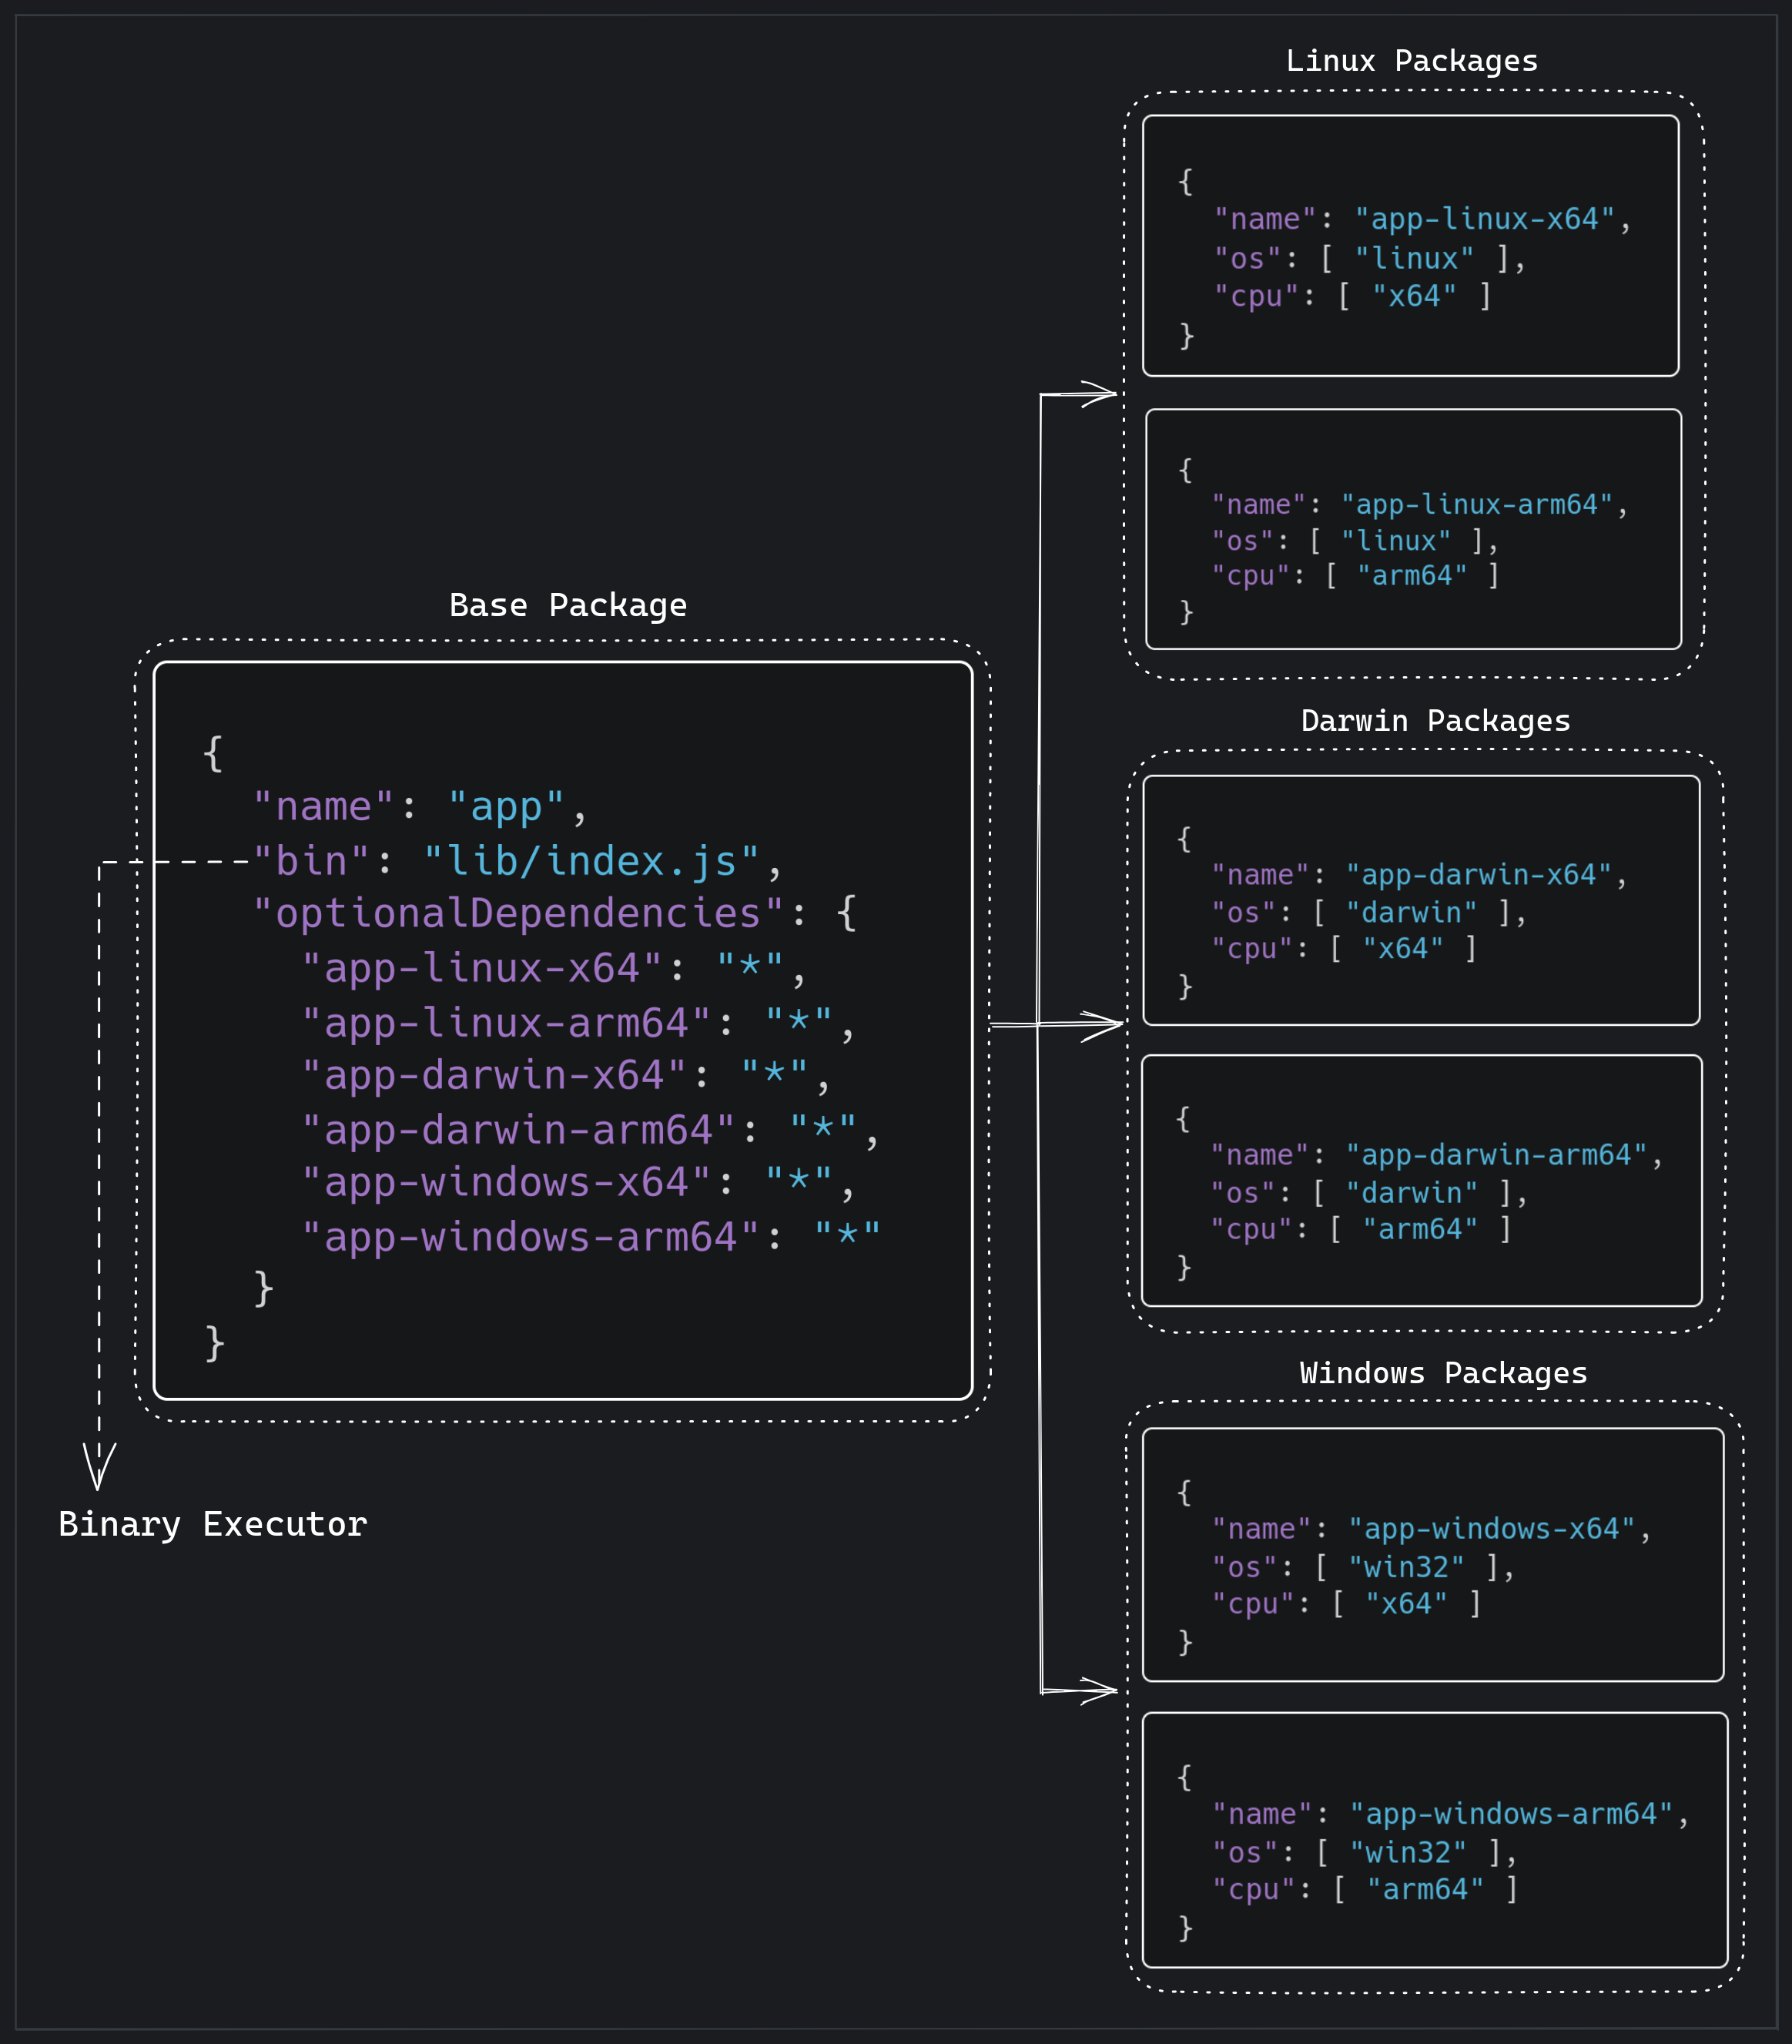
Here, we are taking the following advantages of package.json:
bin: This field points to our main executable (a command or local file name) in the package. When the package is installed globally, that file will be linked inside the global bins directory. For example, on an Unix-like OS it'll create a symlink from theindex.jsscript to/usr/local/bin/myappand in the case of Windows it will create a cmd file usually atC:\Users\<Username>\AppData\Roaming\npm\myapp.cmdwhich runs theindex.jsscript.
One thing to note here is that the file referenced in bin should have #!/usr/bin/env node as shebang, otherwise the script is started without the node executable.
optionaldependencies: This field is for the dependencies that can be used but not strictly needed for the package. We will be specifying our target-specific NPM packages in this field since we only want to install the appropriate package for the current architecture.
But how do we distinguish between different targets and know which optional dependency to install? Well, os and cpu help us to filter the correct dependency among different dependencies.
os: Specifies which operating systems the package will be running on.
Possible values are 'aix', 'darwin', 'freebsd','linux', 'openbsd', 'sunos', and 'win32'.
cpu: Specifies which CPU architecture the package will be running on.
Possible values are 'arm', 'arm64', 'ia32', 'mips', 'mipsel', 'ppc', 'ppc64', 's390', 's390x', and 'x64'.
Packaging
Our project structure will be the following:
$ git ls-tree -r --name-only HEAD | tree --fromfile
.
├── Cargo.lock
├── Cargo.toml # ----------------> manifest of the Rust application
├── .github
│   └── workflows
│       └── cd.yml # ------------> GitHub Actions workflow for automated releases
├── .gitignore
├── npm
│   ├── app
│   │   ├── package.json # ------> metadata of the base NPM package
│   │   ├── src
│   │   │   └── index.ts # ------> entrypoint of the base NPM package (binary executor)
│   │   ├── tsconfig.json
│   │   └── yarn.lock
│   └── package.json.tmpl # -----> template for the target-specific NPM packages
└── src
    └── main.rs # ---------------> entrypoint of the Rust application
Let's create a simple Rust project first:
$ cargo new --bin app && cd app/

$ cargo run

Hello, world!
Next, we need to add our "base" package's package.json file as follows (some fields are stripped):
{
  "name": "app",
  "version": "0.1.0",
  "bin": "lib/index.js",
  "scripts": {
    "typecheck": "tsc --noEmit",
    "lint": "eslint .",
    "lint:fix": "eslint . --fix",
    "build": "tsc",
    "dev": "yarn build && node lib/index.js"
  },
  "devDependencies": {
    "@types/node": "^18.11.18",
    "@typescript-eslint/eslint-plugin": "^5.48.0",
    "@typescript-eslint/parser": "^5.48.0",
    "eslint": "^8.31.0",
    "typescript": "^4.9.4"
  },
  "optionalDependencies": {
    "app-linux-x64": "0.1.0",
    "app-linux-arm64": "0.1.0",
    "app-darwin-x64": "0.1.0",
    "app-darwin-arm64": "0.1.0",
    "app-windows-x64": "0.1.0",
    "app-windows-arm64": "0.1.0"
  }
}
As you can see here, we are setting an optional dependency to each of our target-specific packages so that NPM can decide on the correct package to install based at runtime. So let's add a template for generating these packages.
Huh, wait. Did you say "generating"?
Yes, I think it's a good idea to generate NPM packages during the continuous deployment workflow instead of having 6 different folders and package.json files in our project. The only thing that changes between these packages is the name, os, and the cpu fields so we can simply create them from a template via envsubst(1).
Considering this, we can come up with the following template:
{
  "name": "${node_pkg}",
  "version": "${node_version}",
  "os": ["${node_os}"],
  "cpu": ["${node_arch}"]
}
Okay, that's cool and all but where do we put the binary?
Good question. Our directory structure will look like this after we generate package.json file and build the binary:
$ rg --files npm | tree --fromfile

.
└── npm
    ├── app # ----------------> base package
    │   ├── package.json
    │   ├── src
    │   │   └── index.ts # ---> executor
    │   ├── tsconfig.json
    │   └── yarn.lock
    ├── app-linux-x64 # ------> generated package for linux
    │   ├── bin
    │   │   └── app # --------> binary
    │   └── package.json # ---> metadata
    └── package.json.tmpl
Now we know that the correct optional dependency will be installed alongside our base package and it will contain the binary. But, how do we locate it and execute it? Well, that's why we have our src/index.ts:
#!/usr/bin/env node

import { spawnSync } from "child_process";

/**
 * Returns the executable path which is located inside `node_modules`
 * The naming convention is app-${os}-${arch}
 * If the platform is `win32` or `cygwin`, executable will include a `.exe` extension.
 * @see https://nodejs.org/api/os.html#osarch
 * @see https://nodejs.org/api/os.html#osplatform
 * @example "x/xx/node_modules/app-darwin-arm64"
 */
function getExePath() {
  const arch = process.arch;
  let os = process.platform as string;
  let extension = "";
  if (["win32", "cygwin"].includes(process.platform)) {
    os = "windows";
    extension = ".exe";
  }

  try {
    // Since the binary will be located inside `node_modules`, we can simply call `require.resolve`
    return require.resolve(`app-${os}-${arch}/bin/app${extension}`);
  } catch (e) {
    throw new Error(
      `Couldn't find application binary inside node_modules for ${os}-${arch}`
    );
  }
}

/**
 * Runs the application with args using nodejs spawn
 */
function run() {
  const args = process.argv.slice(2);
  const processResult = spawnSync(getExePath(), args, { stdio: "inherit" });
  process.exit(processResult.status ?? 0);
}

run();
When we build the package via yarn build, it will generate lib/index.js which will be our entrypoint for the wrapper.
After we have everything in place, we can simply publish these packages via npm publish. However, please note that optional dependencies should be present in NPM registry for building a package. This means that you need to publish each optional dependency before attempting to publish the base package. Otherwise, you might get an error like the following:
error An unexpected error occurred: "https://registry.npmjs.org/app-linux-x64: Not found".
info If you think this is a bug, please open a bug report with the information provided in "/home/runner/work/packaging-rust-for-npm/packaging-rust-for-npm/npm/app/yarn-error.log".
info Visit https://yarnpkg.com/en/docs/cli/install for documentation about this command.
Error: Process completed with exit code 1.
Automation
We can automate the publishing process of the NPM packages with a GitHub Actions workflow which runs when a tag is pushed or a release is created.
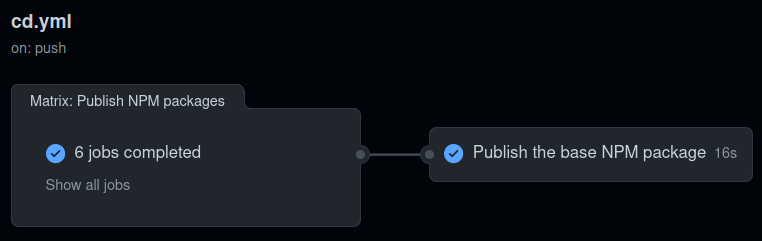
As you can see above, we need to use a build matrix for building binaries and publishing the target-specific NPM packages. For that, we can create the following matrix:
matrix:
  build:
    - {
        NAME: linux-x64-glibc,
        OS: ubuntu-20.04,
        TOOLCHAIN: stable,
        TARGET: x86_64-unknown-linux-gnu,
      }
    - {
        NAME: linux-arm64-glibc,
        OS: ubuntu-20.04,
        TOOLCHAIN: stable,
        TARGET: aarch64-unknown-linux-gnu,
      }
    - {
        NAME: win32-x64-msvc,
        OS: windows-2022,
        TOOLCHAIN: stable,
        TARGET: x86_64-pc-windows-msvc,
      }
    - {
        NAME: win32-arm64-msvc,
        OS: windows-2022,
        TOOLCHAIN: stable,
        TARGET: aarch64-pc-windows-msvc,
      }
    - {
        NAME: darwin-x64,
        OS: macos-14,
        TOOLCHAIN: stable,
        TARGET: x86_64-apple-darwin,
      }
    - {
        NAME: darwin-arm64,
        OS: macos-14,
        TOOLCHAIN: stable,
        TARGET: aarch64-apple-darwin,
      }
Here, we have the following fields in each matrix field:
NAME: Name of the build (formatted as<os>-<arch>-<env>).OS: Type of machine to run the job on (i.e. runner).TOOLCHAIN: Type of the Rust toolchain.TARGET: Type of the Rust target (i.e. target triple).
The important part is we will later use NAME to derive the name of the NPM package. For example, linux-x64-glibc will correspond to <app>-linux-x64.
Next, we can build a binary for each build target as follows:
- name: Checkout
  uses: actions/checkout@v3

- name: Set the release version
  shell: bash
  run: echo "RELEASE_VERSION=${GITHUB_REF:11}" >> $GITHUB_ENV

- name: Install Rust toolchain
  uses: actions-rs/toolchain@v1
  with:
    toolchain: ${{ matrix.build.TOOLCHAIN }}
    target: ${{ matrix.build.TARGET }}
    override: true

- name: Build
  uses: actions-rs/cargo@v1
  with:
    command: build
    args: --release --locked --target ${{ matrix.build.TARGET }}
    use-cross: ${{ matrix.build.OS == 'ubuntu-20.04' }} # use `cross` for Linux builds
And then, we finally generate the NPM package and publish it:
- name: Install node
  uses: actions/setup-node@v3
  with:
    node-version: "16"
    registry-url: "https://registry.npmjs.org"

- name: Publish to NPM
  shell: bash
  run: |
    cd npm
    # set the binary name
    bin="app"
    # derive the OS and architecture from the build matrix name
    # note: when split by a hyphen, the first part is the OS and the second is the architecture
    node_os=$(echo "${{ matrix.build.NAME }}" | cut -d '-' -f1)
    export node_os
    node_arch=$(echo "${{ matrix.build.NAME }}" | cut -d '-' -f2)
    export node_arch
    # set the version
    export node_version="${{ env.RELEASE_VERSION }}"
    # set the package name
    # note: use 'windows' as OS name instead of 'win32'
    if [ "${{ matrix.build.OS }}" = "windows-2022" ]; then
      export node_pkg="${bin}-windows-${node_arch}"
    else
      export node_pkg="${bin}-${node_os}-${node_arch}"
    fi
    # create the package directory
    mkdir -p "${node_pkg}/bin"
    # generate package.json from the template
    envsubst < package.json.tmpl > "${node_pkg}/package.json"
    # copy the binary into the package
    # note: windows binaries has '.exe' extension
    if [ "${{ matrix.build.OS }}" = "windows-2022" ]; then
      bin="${bin}.exe"
    fi
    cp "../target/${{ matrix.build.TARGET }}/release/${bin}" "${node_pkg}/bin"
    # publish the package
    cd "${node_pkg}"
    npm publish --access public
  env:
    NODE_AUTH_TOKEN: ${{ secrets.NPM_TOKEN }}
As the final step, we publish the base package in another job:
publish-npm-base:
  name: Publish the base NPM package
  needs: publish-npm-binaries
  runs-on: ubuntu-20.04
  steps:
    - name: Checkout
      uses: actions/checkout@v3

    - name: Install node
      uses: actions/setup-node@v3
      with:
        node-version: "16"
        registry-url: "https://registry.npmjs.org"

    - name: Publish the package
      shell: bash
      run: |
        cd npm/app
        yarn install # requires optional dependencies to be present in the registry
        yarn build
        npm publish --access public
      env:
        NODE_AUTH_TOKEN: ${{ secrets.NPM_TOKEN }}
Here is the complete workflow file:
`cd.yml` (*click to expand*)
name: Continuous Deployment

on:
  push:
    tags:
      - "v*.*.*"

jobs:
  publish-npm-binaries:
    name: Publish NPM packages
    runs-on: ${{ matrix.build.os }}
    strategy:
      fail-fast: false
      matrix:
        build:
          - {
              NAME: linux-x64-glibc,
              OS: ubuntu-20.04,
              TOOLCHAIN: stable,
              TARGET: x86_64-unknown-linux-gnu,
            }
          - {
              NAME: linux-arm64-glibc,
              OS: ubuntu-20.04,
              TOOLCHAIN: stable,
              TARGET: aarch64-unknown-linux-gnu,
            }
          - {
              NAME: win32-x64-msvc,
              OS: windows-2022,
              TOOLCHAIN: stable,
              TARGET: x86_64-pc-windows-msvc,
            }
          - {
              NAME: win32-arm64-msvc,
              OS: windows-2022,
              TOOLCHAIN: stable,
              TARGET: aarch64-pc-windows-msvc,
            }
          - {
              NAME: darwin-x64,
              OS: macos-14,
              TOOLCHAIN: stable,
              TARGET: x86_64-apple-darwin,
            }
          - {
              NAME: darwin-arm64,
              OS: macos-14,
              TOOLCHAIN: stable,
              TARGET: aarch64-apple-darwin,
            }
    steps:
      - name: Checkout
        uses: actions/checkout@v3

      - name: Set the release version
        shell: bash
        run: echo "RELEASE_VERSION=${GITHUB_REF:11}" >> $GITHUB_ENV

      - name: Install Rust toolchain
        uses: actions-rs/toolchain@v1
        with:
          toolchain: ${{ matrix.build.TOOLCHAIN }}
          target: ${{ matrix.build.TARGET }}
          override: true

      - name: Build
        uses: actions-rs/cargo@v1
        with:
          command: build
          args: --release --locked --target ${{ matrix.build.TARGET }}
          use-cross: ${{ matrix.build.OS == 'ubuntu-20.04' }} # use `cross` for Linux builds

      - name: Install node
        uses: actions/setup-node@v3
        with:
          node-version: "16"
          registry-url: "https://registry.npmjs.org"

      - name: Publish to NPM
        shell: bash
        run: |
          cd npm
          # set the binary name
          bin="app"
          # derive the OS and architecture from the build matrix name
          # note: when split by a hyphen, first part is the OS and the second is the architecture
          node_os=$(echo "${{ matrix.build.NAME }}" | cut -d '-' -f1)
          export node_os
          node_arch=$(echo "${{ matrix.build.NAME }}" | cut -d '-' -f2)
          export node_arch
          # set the version
          export node_version="${{ env.RELEASE_VERSION }}"
          # set the package name
          # note: use 'windows' as OS name instead of 'win32'
          if [ "${{ matrix.build.OS }}" = "windows-2022" ]; then
            export node_pkg="${bin}-windows-${node_arch}"
          else
            export node_pkg="${bin}-${node_os}-${node_arch}"
          fi
          # create the package directory
          mkdir -p "${node_pkg}/bin"
          # generate package.json from the template
          envsubst < package.json.tmpl > "${node_pkg}/package.json"
          # copy the binary into the package
          # note: windows binaries has '.exe' extension
          if [ "${{ matrix.build.OS }}" = "windows-2022" ]; then
            bin="${bin}.exe"
          fi
          cp "../target/${{ matrix.build.TARGET }}/release/${bin}" "${node_pkg}/bin"
          # publish the package
          cd "${node_pkg}"
          npm publish --access public
        env:
          NODE_AUTH_TOKEN: ${{ secrets.NPM_TOKEN }}

  publish-npm-base:
    name: Publish the base NPM package
    needs: publish-npm-binaries
    runs-on: ubuntu-20.04
    steps:
      - name: Checkout
        uses: actions/checkout@v3

      - name: Install node
        uses: actions/setup-node@v3
        with:
          node-version: "16"
          registry-url: "https://registry.npmjs.org"

      - name: Publish the package
        shell: bash
        run: |
          cd npm/app
          yarn install # requires optional dependencies to be present in the registry
          yarn build
          npm publish --access public
        env:
          NODE_AUTH_TOKEN: ${{ secrets.NPM_TOKEN }}
Why use app-windows-x64 instead of app-win32-x64?
If you read the GitHub Actions workflow file carefully, you might have realized there is an extra check for publishing the package as app-windows-x64 although using app-win32-x64 would be easier because we already named our build matrix as win32-x64-msvc.
The reason for that change is the NPM registry itself:
npm ERR! 403 403 Forbidden - PUT https://registry.npmjs.org/app-win32-x64 - Package name triggered spam detection; if you believe this is in error, please contact support at https://npmjs.com/support
Apparently, NPM doesn't like numbers in package names and recognizes them as spam. As stupid as it sounds, it's true. Other people on the internet also suffered from this issue:
Stupid npm 😡 the name of chip is pcf8575, which name should I use?
- a random NPM victim
However, I reached out to the support and they actually helped me to publish the win32 package.
Hi Orhun,
Sorry to hear about the trouble you were having.
We've initiated some blocks related to package names. Our hope is this will help with both security and spam concerns we're facing.
As support, we're able to move beyond the block. I've published the
git-cliff-win32-x64andgit-cliff-win32-arm64packages and transferred write access to the packages over to yourorhunuser account.
But it's better to just have it named as windows since we don't want to deal with the spam protection mechanism.
Result
After publishing the NPM packages for your Rust project, you can use npx to install/run the application. For example:
$ npx git-cliff@latest

Need to install the following packages:
  git-cliff@1.1.2
Ok to proceed? (y) y
As an alternative to npx, you can use dum which is a faster alternative written in Rust:
$ dum install git-cliff

$ dum run git-cliff
Conclusion
I hope this guide was helpful for people who want to do crazy stuff like putting their Rust projects on NPM!
All the code can be found in this repository: https://github.com/orhun/packaging-rust-for-npm
Cheers!