Recently I have been interested in Alpine Linux and thought it would be nice to maintain some Rust packages in their repositories. In this post, I will share my notes/adventures on setting up a packaging environment and a tool called "alpkg" for automating this process.

My first interest in Alpine Linux began when I first started to containerize my open source projects using lightweight Alpine containers. I especially like to follow this approach for Rust applications because the sizes of traditional (glibc) distro containers like Debian/Ubuntu can go up to 200-300MB due to bloat whereas Alpine (musl) containers can stay so minimal such as only 3 MB!
Here is an example Dockerfile from rustypaste that results in a 3MB image when built/compressed:
FROM rust:1.67.0-alpine3.17 as builder
WORKDIR /app
RUN apk update
RUN apk add --no-cache musl-dev
COPY . .
RUN cargo build --locked --release
RUN mkdir -p build-out/
RUN cp target/release/rustypaste build-out/

FROM scratch
WORKDIR /app
COPY --from=builder /app/build-out/rustypaste .
ENV SERVER__ADDRESS=0.0.0.0:8000
EXPOSE 8000
USER 1000:1000
CMD ["./rustypaste"]
One thing to note here, I especially choose scratch image as the runner since it is super minimal. You can get similar results with images like distroless as well.
Although you need to deal with compiling with musl sometimes, it is worth the hassle when the result is that satisfying. Other things that are different in Alpine are the following:
glibc               ➔  musl
systemd             ➔  OpenRC
GNU Core Utilities  ➔  BusyBox
For more information about Alpine, check out this post which goes into detail about why it's neat.
Now, let's talk about how to set up a packaging environment for Alpine Linux.
Overview
In my specific case, I would like to keep using my Arch Linux system and also package for Alpine Linux. There are a couple of options for doing that:
- Run Alpine Linux on a virtual machine
- Run Alpine Linux in a chroot
- Use a Docker/Podman container with persistent storage
I immediately eliminated the first option since I didn't want to deal with VM software and thought it would add extra complexity to my setup.
Then I spun up a Docker container that runs Alpine and tried to make the storage persistent. After coming across this StackOverflow post, it turned out to be something harder than I expected and I started to feel like I was re-inventing VMs due to all those mount-binds and permissions. Unsurprisingly enough, I ditched that idea as well.
Later on, I came across this great article on Alpine Wiki about creating a chroot:
Inside the chroot environment, you can build, debug, and run Alpine packages or develop things. It's the most known way to do so without replacing your system or using a Virtual Machine.
This is exactly what I needed!
After settling on what to use, I had a plan in mind and came up with this diagram:
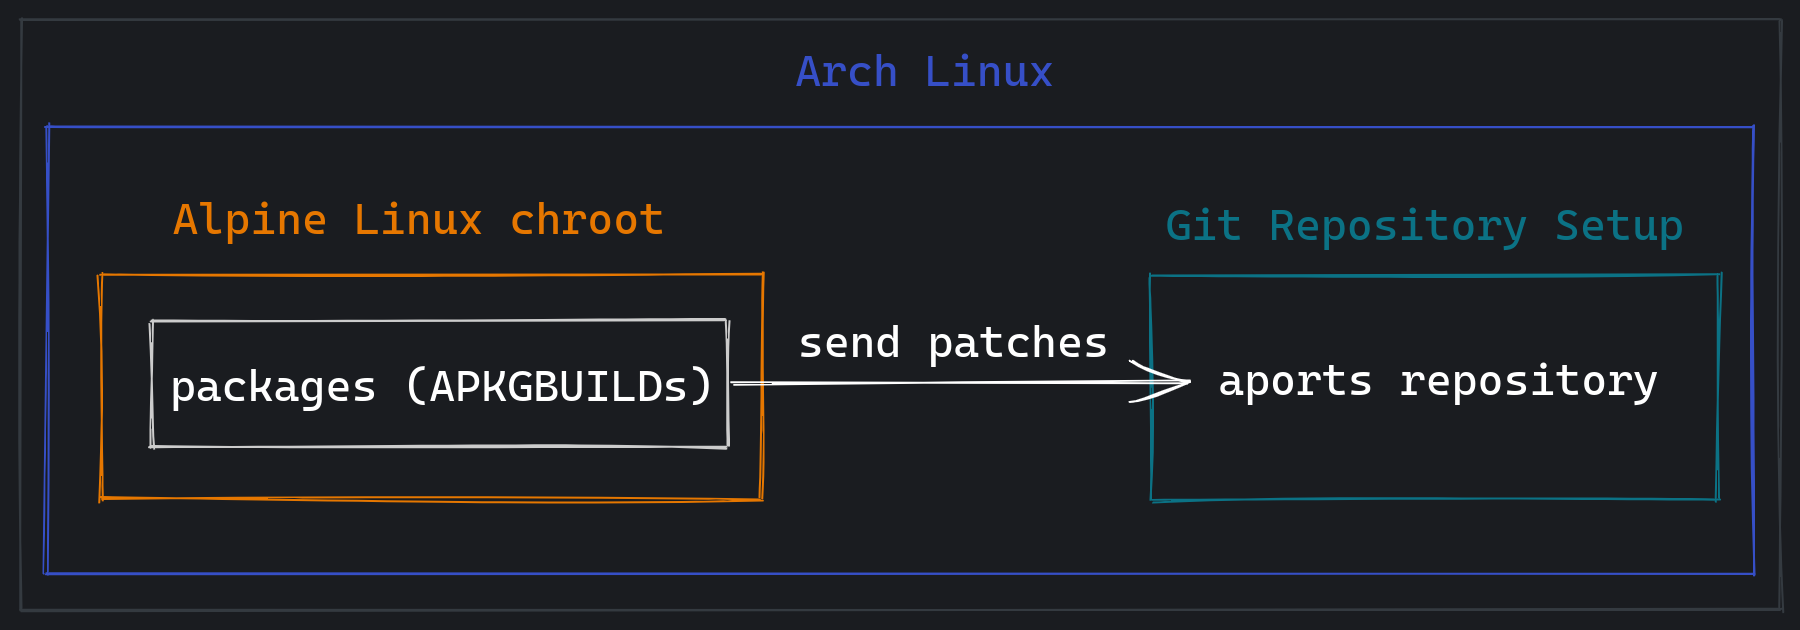
Let's break it down:
- Everything is running inside Arch Linux.
- There is a chroot container that holds the package sources and Alpine SDK tools needed.
- There is a Git repository set up outside the chroot for adding/updating/deleting packages.
- For interacting with the repositories, we can simply send a patch (i.e. merge request) to
aportsrepositories which reside in gitlab.alpinelinux.org/alpine/aports. - We only need to create a GitLab account and fork the repository, no special role is needed!
- For interacting with the repositories, we can simply send a patch (i.e. merge request) to
Setting up the chroot
alpine-chroot-install is a tool that automates the manual steps of creating a chroot. We can use it as follows:
$ alpine-chroot-install \
	-a x86_64 \      # architecture
	-d alpine \      # directory
	-p build-base \  # install build-base
	-p alpine-sdk    # install alpine-sdk
In a couple of seconds, it will create a chroot and we can easily switch to it with the following script:
$ alpine/enter-chroot -u "$USER" <CMD>
And here we have Alpine Linux running inside Arch Linux!
Story Time
After I created the Alpine chroot, I played around a bit and tried out different features of apk package manager. I installed some of my favorite Rust tools and everything was working smoothly.
Then I got an idea: I should try installing those tools during the chroot installation. Luckily, alpine-chroot-install has an option for it and you can simply use -p <pkg> for installing packages.
Of course, I wanted to remove the chroot directory I just created before creating another chroot. For a second I thought chroot was just a simple directory and tried to delete it with rm -rf.
Ouch.
However, chroot was not a regular directory. It has a bunch of things mounted to it:
$ alpine-chroot-install

# ...
> Binding filesystems into chroot
mount: none mounted on /alpine/proc.
mount: /sys bound on /alpine/sys.
mount: /dev bound on /alpine/dev.
So when I deleted chroot, I also deleted /dev x_x
$ rm -rf /chroot

rm: WARNING: Circular directory structure.
This almost certainly means that you have a corrupted file system.
NOTIFY YOUR SYSTEM MANAGER.
Then everything started to fail:
$ ls

Failed to open file to remap file descriptor (No such file or directory)
/dev/null was also gone and I got errors like "permission denied: /dev/null" as well. Fun.
Luckily a simple reboot fixes this issue. The scariest part was when everything started to throw errors left and right, I panicked and realized what I did. I was afraid I rm -rf'd my whole system but luckily it was just the mount points.
Lesson learned, I used the removal script for deleting the chroot next time: /chroot/destroy --remove.
Setting up the packaging environment
Let's install the necessary packages for packaging/development on Alpine:
$ apk add alpine-sdk atoolsAfter that, we need to configure the build defaults in /etc/abuild.conf, especially the packager information:
# PACKAGER and MAINTAINER are used by newapkbuild when creating new aports for
# the APKBUILD's "Contributor:" and "Maintainer:" comments, respectively.
PACKAGER="Your Name <your@email.address>"
MAINTAINER="$PACKAGER"
Next, we can configure the security keys:
$ abuild-keygen --append --installAfter this step, we are now ready for preparing APKBUILDs according to this guide and build them via abuild -r.
Setting up the repository
After forking the aports repository on GitLab, we can clone it somewhere on our main system and configure Git according to the packager information we have provided earlier in /etc/abuild.conf:
$ git clone https://gitlab.alpinelinux.org/<user>/aports
$ git config --global user.name "Your Name"
$ git config --global user.email "your@email.address"
Official documentation recommends adding the following Git hook for automatically generating the commit message based on the package that is being committed:
$ cat <<-'_EOF_' >".git/hooks/prepare-commit-msg"
  #!/bin/sh
  case "$2,$3" in
    ,|template,)
      if git diff-index --diff-filter=A --name-only --cached HEAD \
          | grep -q '/APKBUILD$'; then
        meta() { git diff --staged | grep "^+$1" | sed 's/.*="\?//;s/"$//';}
        printf 'testing/%s: new aport\n\n%s\n%s\n' "$(meta pkgname)" \
          "$(meta url)" "$(meta pkgdesc)" "$(cat $1)" > "$1"
      else
        printf '%s\n\n%s' `git diff-index --name-only --cached HEAD \
          | sed -n 's/\/APKBUILD$//p;q'` "$(cat $1)" > "$1"
      fi;;
  esac
_EOF_
chmod +x ".git/hooks/prepare-commit-msg"
This hook will result in generating commit messages such as:
testing/git-cliff: new aport

https://github.com/orhun/git-cliff
A highly customizable changelog generator
testing/
Nice.
Creating packages
Alpine Linux has a convenient tool called newapkbuild for generating APKBUILD prototypes based on the given parameters:
$ newapkbuild -h

newapkbuild 3.10.0-r0 - generate a new APKBUILD
Usage: newapkbuild [-n PKGNAME] [-d PKGDESC] [-l LICENSE] [-u URL]
       [-a | -C | -m | -p | -y | -r] [-s] [-c] [-f] [-h]
       PKGNAME[-PKGVER] | SRCURL
Options:
  -n  Set package name to PKGNAME (only use with SRCURL)
  -d  Set package description to PKGDESC
  -l  Set package license to LICENSE, use identifiers from:
      <https://spdx.org/licenses/>
  -u  Set package URL
  -a  Create autotools package (use ./configure ...)
  -C  Create CMake package (Assume cmake/ is there)
  -m  Create meson package (Assume meson.build is there)
  -p  Create perl package (Assume Makefile.PL is there)
  -y  Create python package (Assume setup.py is there)
  -r  Create rust package (Assume Cargo.toml is there)
  -s  Use sourceforge source URL
  -c  Copy a sample init.d, conf.d, and install script
  -f  Force even if directory already exists
  -h  Show this help
It is especially useful if you don't want to write the same boilerplate functions over and over again.
It can be used for Rust packages as follows:
$ newapkbuild -r \
              -u "https://github.com/orhun/git-cliff" \
              -d "A highly customizable changelog generator" \
              -l "GPL-3.0-only" \
              "git-cliff"
This will generate the following APKBUILD in git-cliff directory:
# Contributor: Your Name <your@email.address>
# Maintainer: Your Name <your@email.address>
pkgname=git-cliff
pkgver=
pkgrel=0
pkgdesc="A highly customizable changelog generator"
url="https://github.com/orhun/git-cliff"
arch="all"
license="GPL-3.0-only"
depends=""
makedepends="cargo"
checkdepends=""
install=""
subpackages="$pkgname-dev $pkgname-doc"
source=""
builddir="$srcdir/"

prepare() {
	default_prepare

	cargo fetch --locked
}

build() {
	cargo build --frozen --release
}

check() {
	cargo test --frozen
}

package() {
	cargo install --frozen --offline --path . --root="$pkgdir/usr"
	rm "$pkgdir"/usr/.crates*
}
You can read more about APKBUILD functions/variables in the official reference. With some edits, we can fit our project into this template easily. Here is the final APKBUILD:
# Contributor: Orhun Parmaksız <orhunparmaksiz@gmail.com>
# Maintainer: Orhun Parmaksız <orhunparmaksiz@gmail.com>
pkgname=git-cliff
pkgver=1.1.2
pkgrel=0
pkgdesc="A highly customizable changelog generator"
url="https://github.com/orhun/git-cliff"
# s390x, ppc64le, riscv64: blocked by ring crate
arch="all !s390x !ppc64le !riscv64"
license="GPL-3.0-or-later"
makedepends="
	cargo
	libgit2-dev
	"
subpackages="
	$pkgname-doc
	$pkgname-bash-completion
	$pkgname-zsh-completion
	$pkgname-fish-completion
	"
options="net"
source="$pkgname-$pkgver.tar.gz::https://github.com/orhun/git-cliff/archive/v$pkgver.tar.gz"

prepare() {
	default_prepare

	cargo fetch --target="$CTARGET" --locked
}

build() {
	cargo build --frozen --release
	mkdir -p man
	OUT_DIR=man/ "./target/release/$pkgname-mangen"
	mkdir -p completions
	OUT_DIR=completions/ "./target/release/$pkgname-completions"
}

check() {
	cargo test --frozen -- --skip "git_log"
}

package() {
	install -Dm 755 "target/release/$pkgname" -t "$pkgdir/usr/bin"
	install -Dm 644 README.md -t "$pkgdir/usr/share/doc/$pkgname"
	install -Dm 644 "man/$pkgname.1" -t "$pkgdir/usr/share/man/man1"
	install -Dm 644 "completions/$pkgname.bash" "$pkgdir/usr/share/bash-completion/completions/$pkgname"
	install -Dm 644 "completions/$pkgname.fish" -t "$pkgdir/usr/share/fish/completions"
	install -Dm 644 "completions/_$pkgname" -t "$pkgdir/usr/share/zsh/site-functions"
}

sha512sums="
f5564f1d6d492ea6527f2ac10eaa1dc90aa1846fb9b090224ff7a2c1cad78d8850a13364c5e4beae987c4ebf65891e804e0677fd9ab193e56d9565292d6cf2ba  git-cliff-1.1.2.tar.gz
"
After we have the APKBUILD, we can use the following commands.
To generate checksums:
$ abuild checksumTo build:
$ abuild -rTo lint:
$ apkbuild-lint APKBUILDAfter the package is successfully built, there will be an apk file in the $HOME/packages directory. It is possible to list the apk contents with the following command:
$ tar tvvf git-cliff-1.1.2-r0.apk
-rw-r--r-- 0/0             512 2023-03-22 19:08 .SIGN.RSA.orhunparmaksiz@gmail.com-641b3a67.rsa.pub
-rw-r--r-- root/root       754 2023-03-22 19:08 .PKGINFO
drwxr-xr-x root/root         0 2023-03-22 19:08 usr/
drwxr-xr-x root/root         0 2023-03-22 19:08 usr/bin/
-rwxr-xr-x root/root   7064056 2023-03-22 19:08 usr/bin/git-cliff
-rwxr-xr-x root/root    469160 2023-03-22 19:08 usr/bin/git-cliff-completions
-rwxr-xr-x root/root    440488 2023-03-22 19:08 usr/bin/git-cliff-mangen
To install the locally built package, we can update the repository index (/etc/apk/repositories) to point to the local directory and install it via apk:
$ cat /etc/apk/repositories

/home/orhun/packages/orhun/
http://dl-cdn.alpinelinux.org/alpine/latest-stable/main
http://dl-cdn.alpinelinux.org/alpine/latest-stable/community

$ apk add git-cliff
If everything works fine, then congratulations, you just built your first Alpine package!
Submitting patches
Alpine Linux has 3 repositories:
main: Directly supported official packages which are maintained by the Alpine core team.
- Similar to
core/extrarepositories in Arch Linux.
community: Packages that are created by the contributors and developers. Not fully supported, maintenance is dependent on the contributor activity.
- Same as
communityrepository on Arch Linux.
testing: New packages that are added by contributors. Packages from this repository are accepted into thecommunityrepository. This repository is only available on edge (development) branch of Alpine.
- Similar to the AUR /
testingrepositories on Arch Linux.
Since we have just created a new package, it will go to the testing repository. We can simply commit testing/<package>/APKBUILD and then create a merge request on GitLab.
$ cd aports/
$ git pull
$ git checkout -b aport/git-cliff
$ mkdir -p testing/git-cliff
$ cp /chroot/home/orhun/git-cliff/APKBUILD testing/git-cliff/
$ git add testing/git-cliff
$ git commit
$ git push
And there we go: https://gitlab.alpinelinux.org/alpine/aports/-/merge_requests/45319
After the merge request is approved/merged, our package will show up on https://pkgs.alpinelinux.org:
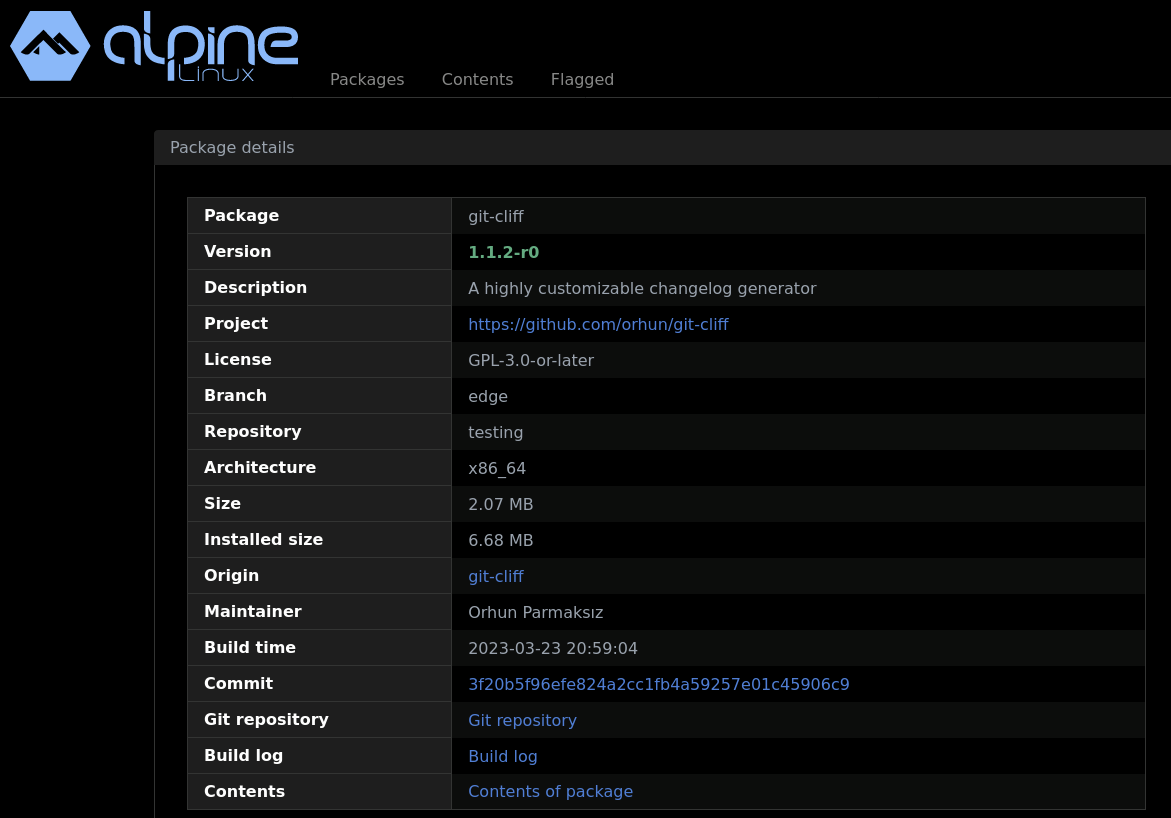
Yay! git-cliff is now available for Alpine Linux!
Automating (mostly) everything with alpkg 🏔️
⭐ GitHub: https://github.com/orhun/alpkg
alpkgcan create a chroot with preinstalled tools in a matter of seconds, set up aports repository, and fetch/update packages. Most importantly, it provides a split layout via Zellij for easy editing/buildingAPKBUILDfiles.

alpkg does everything that is mentioned earlier in this post and more. For example, in the GIF above:
- an Alpine chroot is created. (
alpkg init) - an existing
APKBUILDis fetched. (alpkg fetch) APKBUILDis edited and built. (alpkg edit)- changes are committed to
aports. (alpkg update)
Let's go over these features.
Creating a chroot is as easy as running alpkg init. It also installs the SDK tools that we need and sets up the aports repository for us.
We can fetch and edit a APKBUILD via alpkg fetch. It will provide a split layout for both editing and other operations such as running abuild -r.

To create a new APKBUILD, we can simply use alpkg edit.

Lastly, if we want to commit the changes to aports, we can run alpkg update.

You can get more information about the tool and see detailed usage examples in the repository.
Endnote
Alpine Linux is neat. I'm really looking forward to oxidizing it (add more Rust packages to their repositories) and learning more about their implementation choices to eventually do more development. I'm glad how alpkg turned out and I'm planning to improve it based on my needs and the feedback from the Alpine community. I like automating things.
Hope you enjoyed reading and see you in the next one!
$ docker run alpine echo "안녕히 가세요"