"Ratatui" is a Rust library for building rich terminal user interfaces. In this post, I'm sharing what's new in the latest version and also a fun way to easily create terminal user interfaces in a jiffy.
![]()
See my previous blog post about ratatui for retrospectives and the status of the project.
Today marks the new release of ratatui and we are very excited to share the new things we have been working on in the last month. But before anything, a couple of news about the project:
- We had a meeting on 2023-07-16, you can read the meeting notes here.
- We will have scheduled meetings soon for discussing the status of the project more often. (Still deciding the time & day for that).
- Join the Discord server for keeping up-to-date with
ratatuinews and contributing to the project!
We appreciate everyone who contribute to the project and most importantly Florian Dehau for creating tui-rs in the first place! 💖
Today, I decided to do something different and share a fun thing that has been on my mind for a while before going into what's new in ratatui.
So, without further ado, let's dive into it! 🐁
Generating terminal user interfaces
I have a new open source project coming up in the next months and I am happy to say that I have been using ratatui extensively to build it from the ground. Although it is fun to write TUI code, I sometimes think if it would be possible to find an easier/faster way to avoid boilerplate code and speed up the development. We are still working on improving the widget/stylization API of ratatui to avoid code repetition but still, I sometimes find myself rewriting the same code over and over again.
One day, I had a flashback to a moment from months back where I needed to design a very basic HTML page but I was too lazy to do it and used ChatGPT for it. Well, what if I generate the TUI code as well and save myself from the burden of imagining the widget positions in my mind and trying to code out abstract things. That would be nice, right?
Q: Well, ChatGPT does not support image processing for now. So why waste your time writing prompts for your design instead of writing the actual code instead?
A: Who said I am going to write prompts?
Q: Huh?
That's right. While I was using ChatGPT to generate that simple HTML page, I came up with a text-based but also visual solution. Ladies and gentlemen, I present to you:
ASCIIFlow: a client-side only web based application for drawing ASCII diagrams.
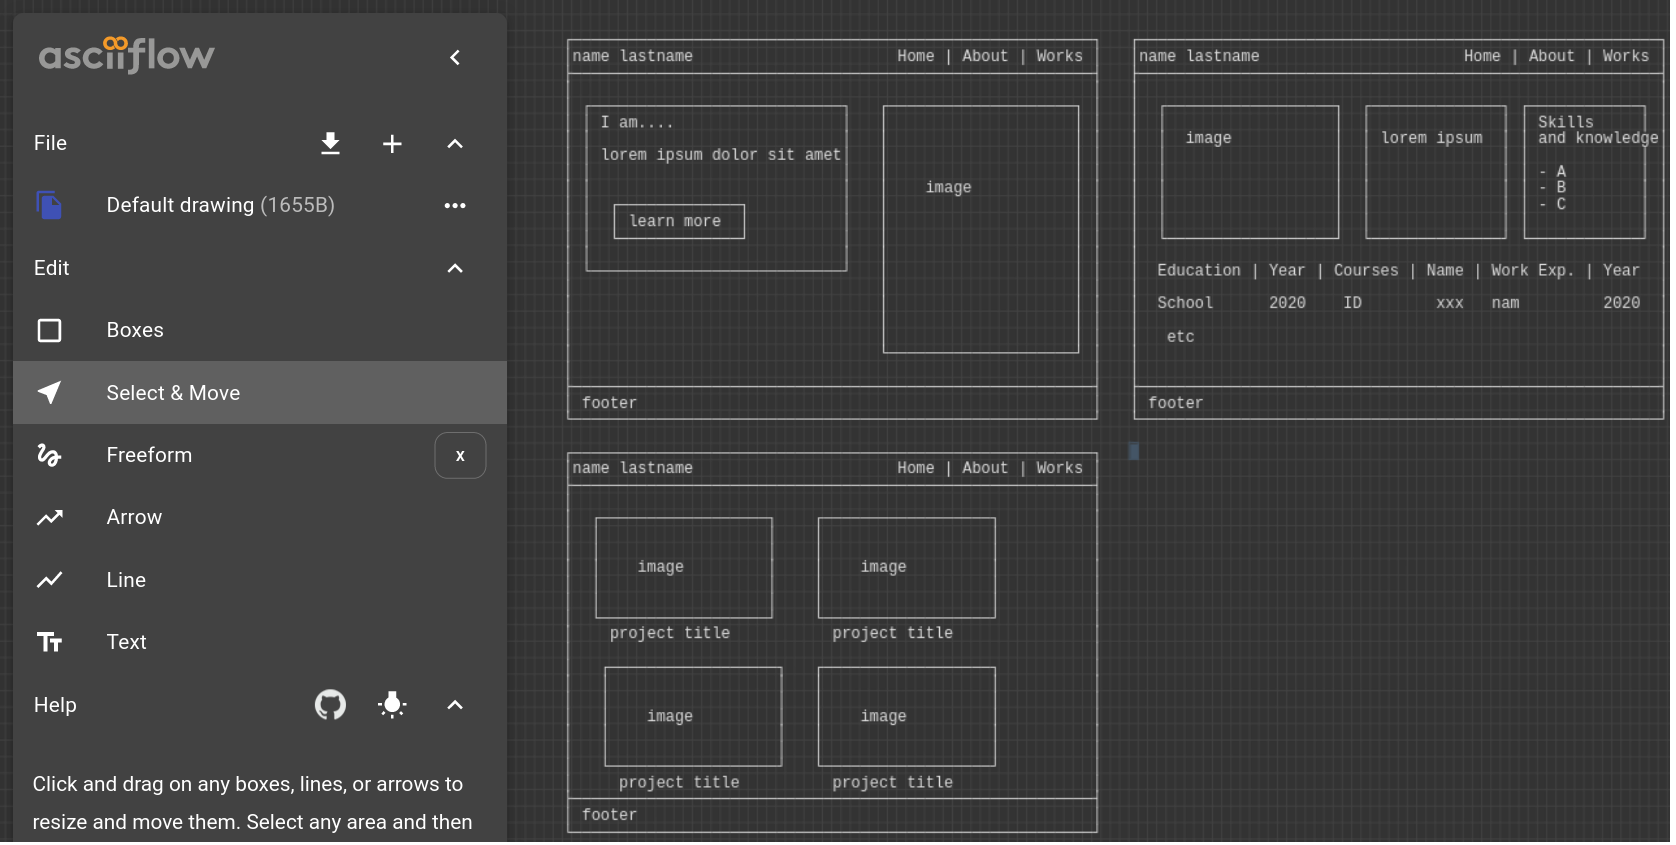
So you can simply draw boxes, lines, arrows, texts, and whatever you imagine on a canvas and export it (or copy it to the clipboard) easily.
In case it isn't clear, our plan is to:
- Design the interface on ASCIIFlow.
- Give the ASCII design (text) to ChatGPT.
- Generate Rust (
ratatui) code. - Profit.
Let's try it!
Prompt: Write the Rust code for using
tui-rslibrary for building the following terminal user interface:┌────────────────orhun's blog────────────────────┐ │ │ │ ┌─ratatui is awesome──────────┐ ┌─stars──────┐ │ │ │ - written in Rust │ │ │ │ │ │ │ │ │ │ │ │ │ - easy to use │ │ ┌┘ │ │ │ │ │ │ │ │ │ │ │ - whole lotta widgets │ │ ┌──┘ │ │ │ │ │ │ │ │ │ │ │ - different backends │ │ │ │ │ │ │ │ │ │ │ │ │ │ - kick-ass name │ │ ┌────┘ │ │ │ │ │ │ │ │ │ │ │ (this is a scrollable list) │ │ │ │ │ └─────────────────────────────┘ └────────────┘ │ │ │ └────────────────────────────────────────────────┘
Unfortunately, ChatGPT doesn't have the knowledge of ratatui yet and it cakes its pants when you want to use it so we are using tui-rs in our prompt. Also, it suggests using tui-rs 0.16.0 which shows how much it is left behind.
But anyways, it can generate some usable Rust code for us.
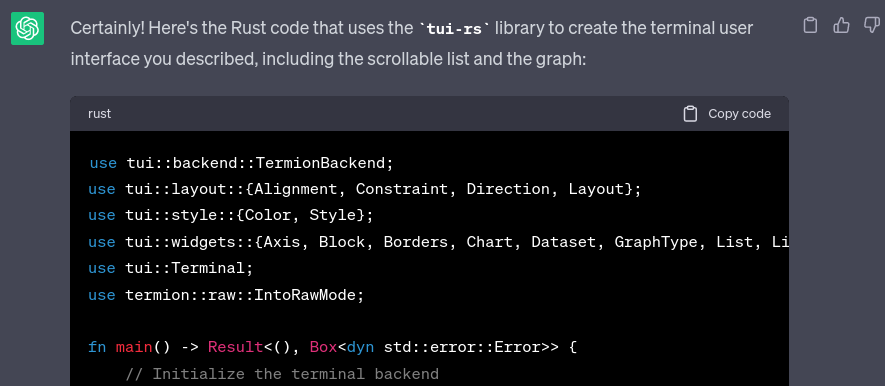
If we remove the unrelated parts such as terminal/backend initialization and event handling, we are left with:
Click to expand
let chunks = Layout::default()
        .direction(Direction::Vertical)
        .constraints([Constraint::Length(3), Constraint::Min(3), Constraint::Length(1)].as_ref())
        .split(terminal.size()?);

let header = Block::default()
    .borders(Borders::ALL)
    .title("orhun's blog")
    .title_style(Style::default().fg(Color::Cyan));

let paragraph = Paragraph::new("ratatui is awesome")
    .block(Block::default().title("".as_ref()).borders(Borders::ALL));

let stars = Paragraph::new("stars")
    .block(Block::default().title("".as_ref()).borders(Borders::ALL));

let widgets = vec![
    ListItem::new("- written in Rust"),
    ListItem::new("- easy to use"),
    ListItem::new("- whole lotta widgets"),
    ListItem::new("- different backends"),
    ListItem::new("- kick-ass name"),
];

let list = List::new(widgets)
    .block(Block::default().title("".as_ref()).borders(Borders::ALL))
    .highlight_style(Style::default().fg(Color::LightGreen));

let dataset = Dataset::default()
    .name("Stars")
    .marker(tui::symbols::Marker::Dot)
    .graph_type(GraphType::Line)
    .style(Style::default().fg(Color::Yellow))
    .data(&[
        (0.0, 0.0),
        (1.0, 100.0),
        (2.0, 200.0),
        (3.0, 300.0),
        (4.0, 400.0),
        (5.0, 500.0),
        (6.0, 600.0),
    ]);

let chart = Chart::new(vec![dataset])
    .block(Block::default().title("".as_ref()).borders(Borders::ALL))
    .x_axis(
        tui::widgets::Axis::default()
            .title("Time")
            .style(Style::default().fg(Color::White)),
    )
    .y_axis(
        tui::widgets::Axis::default()
            .title("Stars")
            .style(Style::default().fg(Color::White)),
    );

terminal.draw(|mut f| {
    f.render_widget(header, chunks[0]);
    f.render_widget(paragraph, chunks[1]);
    f.render_widget(stars, chunks[1]);
    f.render_stateful_widget(list, chunks[1], &mut Default::default());
    f.render_widget(chart, chunks[2]);
})?;
Which is clearly wrong but can be a good stepping stone for what we actually want to build.
Here is the final layout code with some edits:
Click to expand
// Render the header first.
let header = Block::default()
.borders(Borders::ALL)
.title(Title::from("orhun's blog").alignment(Alignment::Center))
.title_style(Style::default().fg(Color::Cyan));
f.render_widget(header, terminal.size()?);
// Split the layout.
let chunks = Layout::default()
.direction(Direction::Horizontal)
.margin(1)
.constraints([Constraint::Percentage(70), Constraint::Percentage(30)].as_ref())
.split(terminal.size()?);
// Prepare the list.
let widgets = vec![
ListItem::new("- written in Rust"),
ListItem::new("- easy to use"),
ListItem::new("- whole lotta widgets"),
ListItem::new("- different backends"),
ListItem::new("- kick-ass name"),
];
let list = List::new(widgets)
.block(
Block::default()
.title("ratatui is awesome".as_ref())
.borders(Borders::ALL),
)
.highlight_style(Style::default().fg(Color::LightGreen));
// Prepare the chart.
let dataset = Dataset::default()
.name("Stars")
.marker(Marker::Dot)
.graph_type(GraphType::Line)
.style(Style::default().fg(Color::Yellow))
.data(&[
(0.0, 0.0),
(1.0, 100.0),
(2.0, 200.0),
(3.0, 300.0),
(4.0, 400.0),
(5.0, 500.0),
(6.0, 600.0),
]);
let chart = Chart::new(vec![dataset])
.block(
Block::default()
.title("stars".as_ref())
.borders(Borders::ALL),
)
.x_axis(
Axis::default()
.title("Time")
.style(Style::default().fg(Color::White))
.bounds([0.0, 6.0]),
)
.y_axis(
Axis::default()
.title("Stars")
.style(Style::default().fg(Color::White))
.bounds([0.0, 600.0]),
);
// Render.
terminal.draw(|mut f| {
f.render_stateful_widget(list, chunks[0], &mut Default::default());
f.render_widget(chart, chunks[1]);
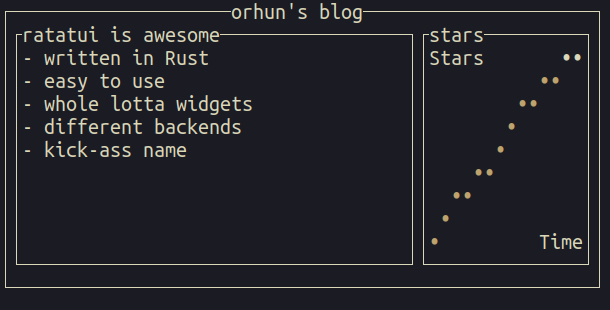
})?;And here we have it:
What's new?
Now that we have seen what we can do using ratatui, it is time to get into the details of the latest release!
Full changelog: https://github.com/ratatui-org/ratatui/releases/tag/v0.22.0
Prelude
We now have a prelude module! This allows users of the library to easily use ratatui without a huge amount of imports.
use ratatui::prelude::*;Aside from the main types that are used in the library, this prelude also re-exports several modules to make it easy to qualify types that would otherwise collide. For example:
use ratatui::{prelude::*, widgets::*};

#[derive(Debug, Default, PartialEq, Eq)]
struct Line;

assert_eq!(Line::default(), Line);
assert_eq!(text::Line::default(), ratatui::text::Line::from(vec![]));
New widget: Scrollbar
A scrollbar widget has been added which can be used with any Rect. It can also be customized with different styles and symbols.
Here are the components of a Scrollbar:
<--▮------->
^  ^   ^   ^
│  │   │   └ end
│  │   └──── track
│  └──────── thumb
└─────────── begin
To use it, render it as a stateful widget along with ScrollbarState:
frame.render_stateful_widget(
    Scrollbar::default()
        .orientation(ScrollbarOrientation::VerticalRight)
        .begin_symbol(Some("↑"))
        .end_symbol(Some("↓")),
    rect,
    &mut scrollbar_state,
);
Will result in:
┌scrollbar──────────────────↑
│This is a longer line      ║
│Veeeeeeeeeeeeeeeery    looo█
│This is a line             ║
└───────────────────────────↓
Block: support multiple titles
Block widget now supports having more than one title via Title widget.
Each title will be rendered with a single space separating titles that are in the same position or alignment. When both centered and non-centered titles are rendered, the centered space is calculated based on the full width of the block, rather than the leftover width.
You can provide various types as the title, including strings, string slices, borrowed strings (Cow<str>), spans, or vectors of spans (Vec<Span>).
It can be used as follows:
Block::default()
    .borders(Borders::ALL)
    .title("Title") // By default in the top right corner
    .title(Title::from("Left").alignment(Alignment::Left))
    .title(Title::from("Center").alignment(Alignment::Center))
    .title(Title::from("Bottom").position(Position::Bottom))
    .title(
        Title::from("Bottom center")
            .alignment(Alignment::Center)
            .position(Position::Bottom),
    );
Results in:
┌Title─Left──Center─────────────┐
│                               │
│                               │
│                               │
└Bottom───Bottom center─────────┘
Barchart: support groups
Barchart has been improved to support adding multiple bars from different data sets. This can be done by using the newly added Bar and BarGroup objects.
This makes it possible to render fancy stuff like this:

See the barchart example for more information and implementation details.
Stylization shorthands
It is possible to use style shorthands for str, Span, and Paragraph.
A crazy example would be:
"hello"
    .on_black()
    .black()
    .bold()
    .underline()
    .dimmed()
    .slow_blink()
    .crossed_out()
    .reversed()
This especially helps with concise styling:
assert_eq!(
  "hello".red().on_blue().bold(),
  Span::styled("hello", Style::default().fg(Color::Red).bg(Color::Blue).add_modifier(Modifier::BOLD))
)
Stylize everything!
All widgets can be styled now (i.e. set_style)
Styled trait is implemented for all the remaining widgets, including:
BarchartChart(includingAxisandDataset)GaugeandLineGaugeListandListItemSparklineTable,Row, andCellTabsStyle
Constant styles
Styles can be constructed in a const context as follows:
const DEFAULT_MODIFIER: Modifier = Modifier::BOLD.union(Modifier::ITALIC);
const EMPTY: Modifier = Modifier::empty();

const DEFAULT_STYLE: Style = Style::with(DEFAULT_MODIFIER, EMPTY)
    .fg(Color::Red)
    .bg(Color::Black);
More colors formats
It is now possible to parse hyphenated color names like light-red via Color::from_str.
Additionally, all colors from the ANSI color table are supported (though some names are not exactly the same).
grayis sometimes calledwhite- this is not supported as we usewhitefor bright whitegrayis sometimes calledsilver- this is supporteddarkgrayis sometimes calledlight blackorbright black(both are supported)whiteis sometimes calledlight whiteorbright white(both are supported)- we support
brightandlightprefixes for all colors - we support
-and_and - we support both
grayandgreyspellings
For example:
use ratatui::style::Color;
use std::str::FromStr;

assert_eq!(Color::from_str("red"), Ok(Color::Red));
assert_eq!("red".parse(), Ok(Color::Red));
assert_eq!("lightred".parse(), Ok(Color::LightRed));
assert_eq!("light red".parse(), Ok(Color::LightRed));
assert_eq!("light-red".parse(), Ok(Color::LightRed));
assert_eq!("light_red".parse(), Ok(Color::LightRed));
assert_eq!("lightRed".parse(), Ok(Color::LightRed));
assert_eq!("bright red".parse(), Ok(Color::LightRed));
assert_eq!("bright-red".parse(), Ok(Color::LightRed));
assert_eq!("silver".parse(), Ok(Color::Gray));
assert_eq!("dark-grey".parse(), Ok(Color::DarkGray));
assert_eq!("dark gray".parse(), Ok(Color::DarkGray));
assert_eq!("light-black".parse(), Ok(Color::DarkGray));
assert_eq!("white".parse(), Ok(Color::White));
assert_eq!("bright white".parse(), Ok(Color::White));
Integrations
Following tools are now integrated into the repository:
cargo-husky: git pre-push hooksbacon: background code checks / coveragecommitizen: conventional commitscargo-deny: linting dependenciestypos: spell checker
Other
- Benchmarks added for the
Paragraphwidget - Added underline colors support for
crosstermbackend - Mark some of the low-level functions of
Block,LayoutandRectasconst - The project license has been updated to acknowledge
ratatuidevelopers
Endnote
Feel free to join the Discord server for chatting/getting help about ratatui. If you are interested in contributing, check out our contribution guidelines and open issues for getting started!
Also, check out these cool apps using ratatui!
Lastly, shout out to these awesome people for their first contributions to the project:
- @Nydragon
- @snpefk
- @Philipp-M
- @mrbcmorris
- @endepointe
- @kdheepak
- @samyosm
- @SLASHLogin
- @karthago1
- @BoolPurist
- @Nogesma
- @lthoerner
Cheers!
🐭