Here is how you can publish a Rust project with a single click of a button and automate everything.
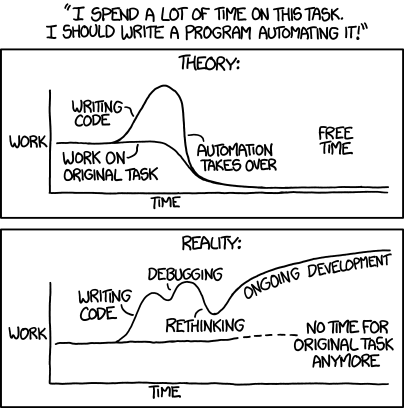
Imagine a developer named nuhro. He wrote his first ever Rust program and it is happily running on his machine. He also sent a binary/exe to a couple of trusting friends and they all loved the program after blindly executing it. Good vibes!
Then one day, he decided to share this small program with the world (AKA Reddit). For that, he realized he needed to release the program. Otherwise, how are the residents of the internet (who might be using different OSes/platforms) going to install/run the program, right?
No worries, there must be an easy way of releasing Rust crates and automating this stuff.
he thought.
And yeah, this was me back in 2019 when I published my first Rust project and automated the release process with a snatched-off GitHub Actions workflow from ripgrep o_O
Coming back to today, if you want to release a Rust project, it is likely that you will come across the following Rust release tools:
cargo-release: everything about releasing a rust crate.cargo-smart-release: release complex cargo-workspaces automatically with changelog generation.cargo-unleash: release automatisation tooling for massiv mono-repos.
We can list other tools here, but in a nutshell, all we want to do is:
- Make sure the project is in a state for the release. This might include updated version/changelog/dependencies.
- Tag the new release.
- Publish the new version on the various platforms (crates.io, GitHub, etc.)
Q: Okay okay, but aren't you overcomplicating things? I mean... just update the version in Cargo.toml and run cargo publish.
A: That's fair, but how about binary releases? As someone who has spent a good amount of time automating NPM releases, I would say this might not be that easy for every project.
Q: I still think you can just copy/paste a GitHub Actions workflow file from another project and adopt it.
A: It is still too much manual work + release process is still not fully automated - you need to create tags/update changelog etc. Besides, your name is "Q" but you are not really asking questions anymore and just rambling. Maybe it is time to introduce you as a new character in these blog posts.
Q: It do be like that sometimes.
Anyhoo, it seems like we are going to end up all over the place if we were to over-plan the release process. I wish there was a more standardized way...
In fact, there is!
The Potent Elixir ✨
Here, we are going to mix up the most powerful tools to come up with the witch's concoction, the ultimate way of publishing Rust crates. Some may call it the toxic brew that might poison one due to over-automation. Some may call it the one-way ticket to the automation hell. Some may--
*ahem*
So here is the list of tools we are going to utilize:
| Tool | Description | Function |
|---|---|---|
git-cliff | A highly customizable Changelog Generator. | Automates the changelog generation. |
release-plz | Publish Rust crates from CI with a Release PR. | Handles dependency updates, version management, and crates.io release. |
cargo-dist | Shippable application packaging for Rust. | Creates GitHub releases and packaging for various platforms. |
Dependabot | Automated dependency updates built into GitHub. | Updates the Rust and GitHub Actions dependencies. |
Mergify | Automated CI/CD tool for optimization. | Automatically merges the Dependabot pull requests. |
With minimal tweaks, we can make these tools work seamlessly integrated with each other and at the end of the day what we have to do is just click a button to trigger a new release. In other words, the best part about this release flow is that almost everything is handled in the CI i.e. GitHub Actions thus we don't even move a finger.

Now, let's get to work!
Setting Things Up ⚙️
git-cliff
git-cliff is one of my big projects and it is widely used in the Rust ecosystem for automating the changelog generation.
git-cliff is a command-line tool (written in Rust) that provides a highly customizable way to generate changelogs from git history. It supports using custom regular expressions to alter changelogs which are mostly based on conventional commits. With a single configuration file, a wide variety of formats can be applied for a changelog, thanks to the Jinja2/Django-inspired template engine. More information and examples can be found in the GitHub repository.
For our changelog format, we can simply go with the default configuration which outputs something like the following:
# Changelog

All notable changes to this project will be documented in this file.

## [unreleased]

### Documentation

- Add link to emacs package support git-cliff (#307)
For this configuration, first, we should install git-cliff:
cargo install git-cliff --lockedThen we can initialize it as follows:
git cliff --initThis will create cliff.toml in the current directory and you can commit it in the root directory of your repo for release-plz to pick it up.
If you want to generate a fancier changelog, you can look at the examples or use the configuration that git-cliff uses which corresponds to the following:
$ git cliff

# Changelog

All notable changes to this project will be documented in this file.

## [unreleased]

### 📚 Documentation

- _(readme)_ Add link to emacs package support git-cliff ([#307](https://github.com/orhun/git-cliff/issues/307)) - ([fa471c7](https://github.com/orhun/git-cliff/commit/fa471c7178dce184ca6fe5bbb24b9c2db96d68ce))
Great, now we are ready to set up the actual releaser tool!
release-plz
release-plz creates a fully automated release pipeline, allowing you to easily release changes more frequently, without the fear of doing typos or other subtle manual mistakes you can make when releasing from your terminal.
Unlike git-cliff, we don't actually need to install release-plz as a command-line tool. It is because release-plz runs from the CI (GitHub Actions) and we are not doing anything locally for the releases. However, we still need to tweak some things regarding how we want to release our project.
For configuring release-plz, create release-plz.toml with the following contents at the root of your repository:
[workspace]
# path of the git-cliff configuration
changelog_config = "cliff.toml"

# enable changelog updates
changelog_update = true

# update dependencies with `cargo update`
dependencies_update = true

# create tags for the releases
git_tag_enable = true

# disable GitHub releases
git_release_enable = false

# labels for the release PR
pr_labels = ["release"]

# disallow updating repositories with uncommitted changes
allow_dirty = false

# disallow packaging with uncommitted changes
publish_allow_dirty = false

# disable running `cargo-semver-checks`
semver_check = false
The important options here are:
changelog_config: should point out to thegit-cliffconfiguration we created in the previous section.dependencies_update: setting this totruemeans that you want to runcargo updatebefore each release. Enabling this for updating the transitive dependencies wouldn't hurt since we will already be updating the main dependencies with Dependabot in future steps.git_tag_enable: set this totrueto create a tag for the new releases.git_release_enable: make sure to set this tofalsesince we don't wantrelease-plzto create a GitHub release for us since that part will be handled bycargo-dist.
As for the next step, we should create the actual release automation that is responsible for running release-plz for each commit pushed to the repository and creating a "release PR".
Q: A release PR?
A: Release PR is a pull request that represents the next release and contains the necessary changes such as version bumps and changelog updates.
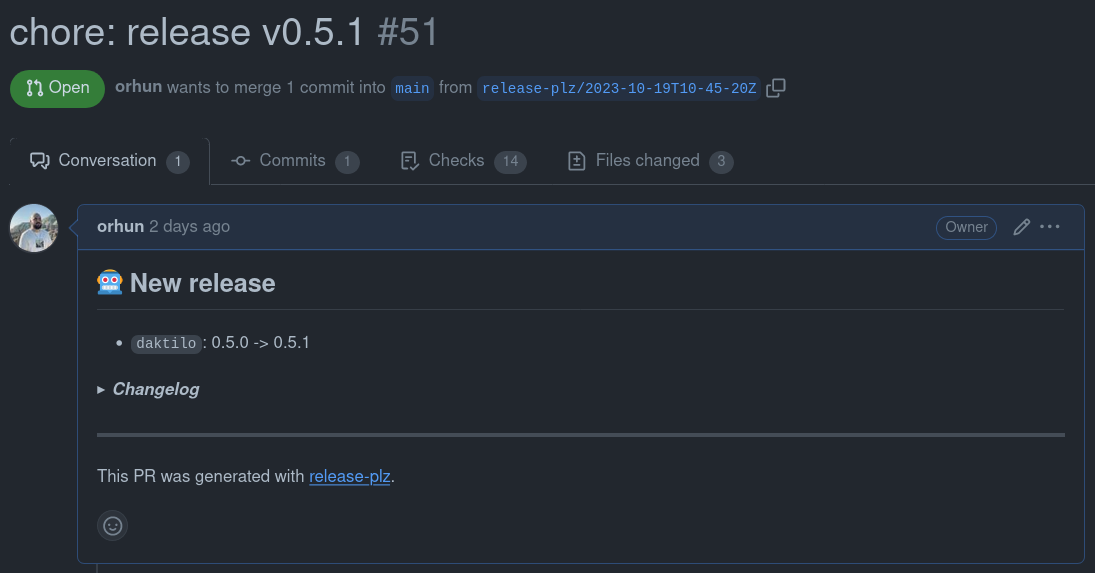
After you merge the release PR, release-plz detects that there is a version change in Cargo.toml and runs cargo publish to release the new version on crates.io.
Q: Ah, so we probably need to set up secrets for the publish token, etc., right?
Yes! And a few permissions, too. You can check out release-plz documentation for more detailed information but here is a quick summary:
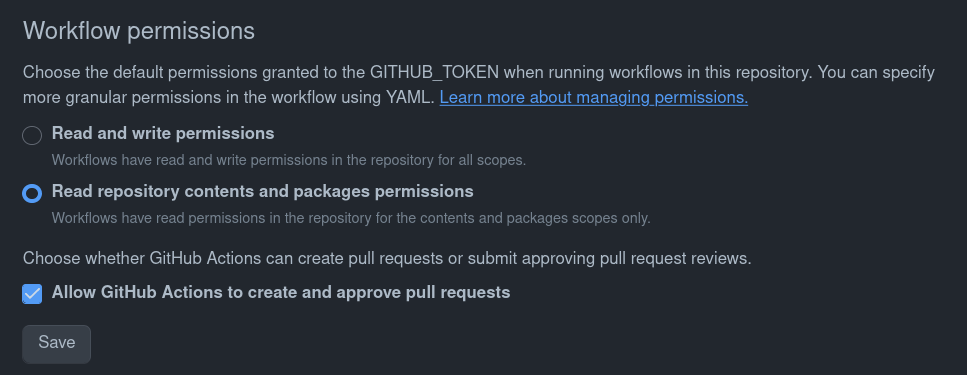
1. Change "Workflow permissions" to allow GitHub Actions to create and approve pull requests in Repository > Settings > Actions > General.
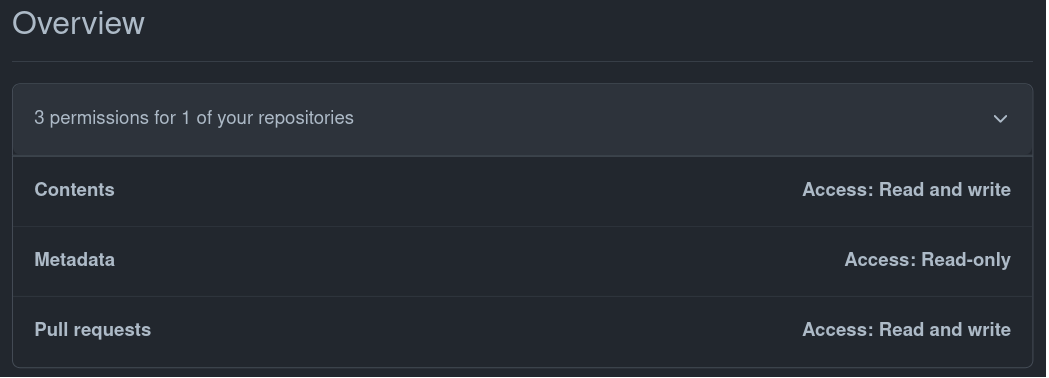
2. Create a new PAT (Personal Access Token) (either fine-grained or classic) with correct repository permissions and add it to the repository as a secret named RELEASE_PLZ_TOKEN.
3. On crates.io, generate a new token with publish-new and publish-update permissions and add it to the repository as a secret named CARGO_REGISTRY_TOKEN.

4. We can finally create our GitHub Actions workflow in .github/workflows/release-plz.yml
name: Continuous Deployment

on:
  push:
    branches:
      - main

jobs:
  release-plz:
    name: Release-plz
    runs-on: ubuntu-latest
    steps:
      - name: Checkout repository
        uses: actions/checkout@v4
        with:
          fetch-depth: 0
          token: ${{ secrets.RELEASE_PLZ_TOKEN }}

      - name: Install Rust toolchain
        uses: dtolnay/rust-toolchain@stable

      - name: Run release-plz
        uses: MarcoIeni/release-plz-action@v0.5
        env:
          GITHUB_TOKEN: ${{ secrets.RELEASE_PLZ_TOKEN }}
          CARGO_REGISTRY_TOKEN: ${{ secrets.CARGO_REGISTRY_TOKEN }}
To break it down:
- We are cloning the entire git history with
fetch-depth: 0, which is necessary to determine the next version and build the changelog. - We are installing Rust stable ('cause why not?!)
- As the last step, we are running
release-plz, heck yea!
Q: Whoa whoa whoa hey hey hey, what's up with GITHUB_TOKEN: ${{ secrets.RELEASE_PLZ_TOKEN }}? Just use ${{ secrets.GITHUB_TOKEN }} bro, which is defined as default for each repository.
A: Good question! If you use GITHUB_TOKEN then it means that you are going to authenticate on behalf of GitHub Actions.
Q: So, what's wrong with that?
A: Well, workflows that are triggered by on: push: tags won't run if the tag is created by GitHub Actions. So we are using a personal access token which is a way of saying "Dear GitHub Actions, I am running release-plz and it is ME who is creating a tag so please run the further workflows". Also, this way we don't need to specify workflow permissions via permissions: key. You can read more about it here.
Now we are simply ready to work on our project as usual and release-plz will create a release PR for our changes and we can merge it to create a new release when we are ready!
Q: What if I want to run/test release-plz locally though?
A: You can if you want! The release PR is just the output of release-plz update command so you can run it locally and see what has changed in terms of changelog etc. Also, if you want to create a PR from the command-line you can simply run release-plz release-pr!
cargo-dist
cargo-dist makes distributing binaries easier by breaking the process down into multiple steps such as plan, build, publish and announce.
It is simply a tool for creating this beautiful release page along with binary artifacts and installers:
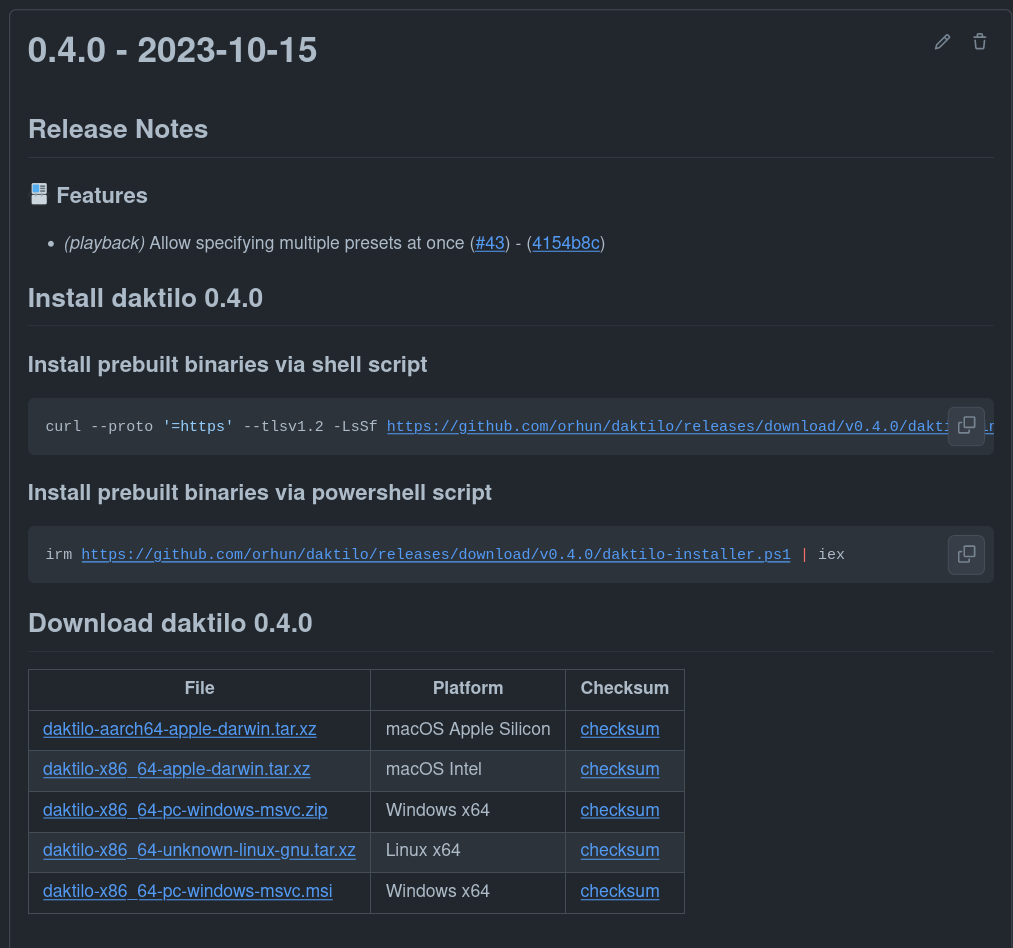
Similar to release-plz, cargo-dist is a tool that we are not going to use locally but run from the CI instead. However, it is required to be installed to set up the CI (for itself) for the first time.
So let's start by installing cargo-dist:
cargo install cargo-dist --lockedYou can also use cargo-dist-installer to install cargo-dist (i.e. the binary installer) if you wish:
cargo_dist_version="0.3.1"

curl --proto '=https' --tlsv1.2 -LsSf https://github.com/axodotdev/cargo-dist/releases/download/v{version}/cargo-dist-installer.sh | sh
We will also have an installer as shown above after cargo dist does its magic.
Q: Magic?
A: Yeah, this:
cargo dist init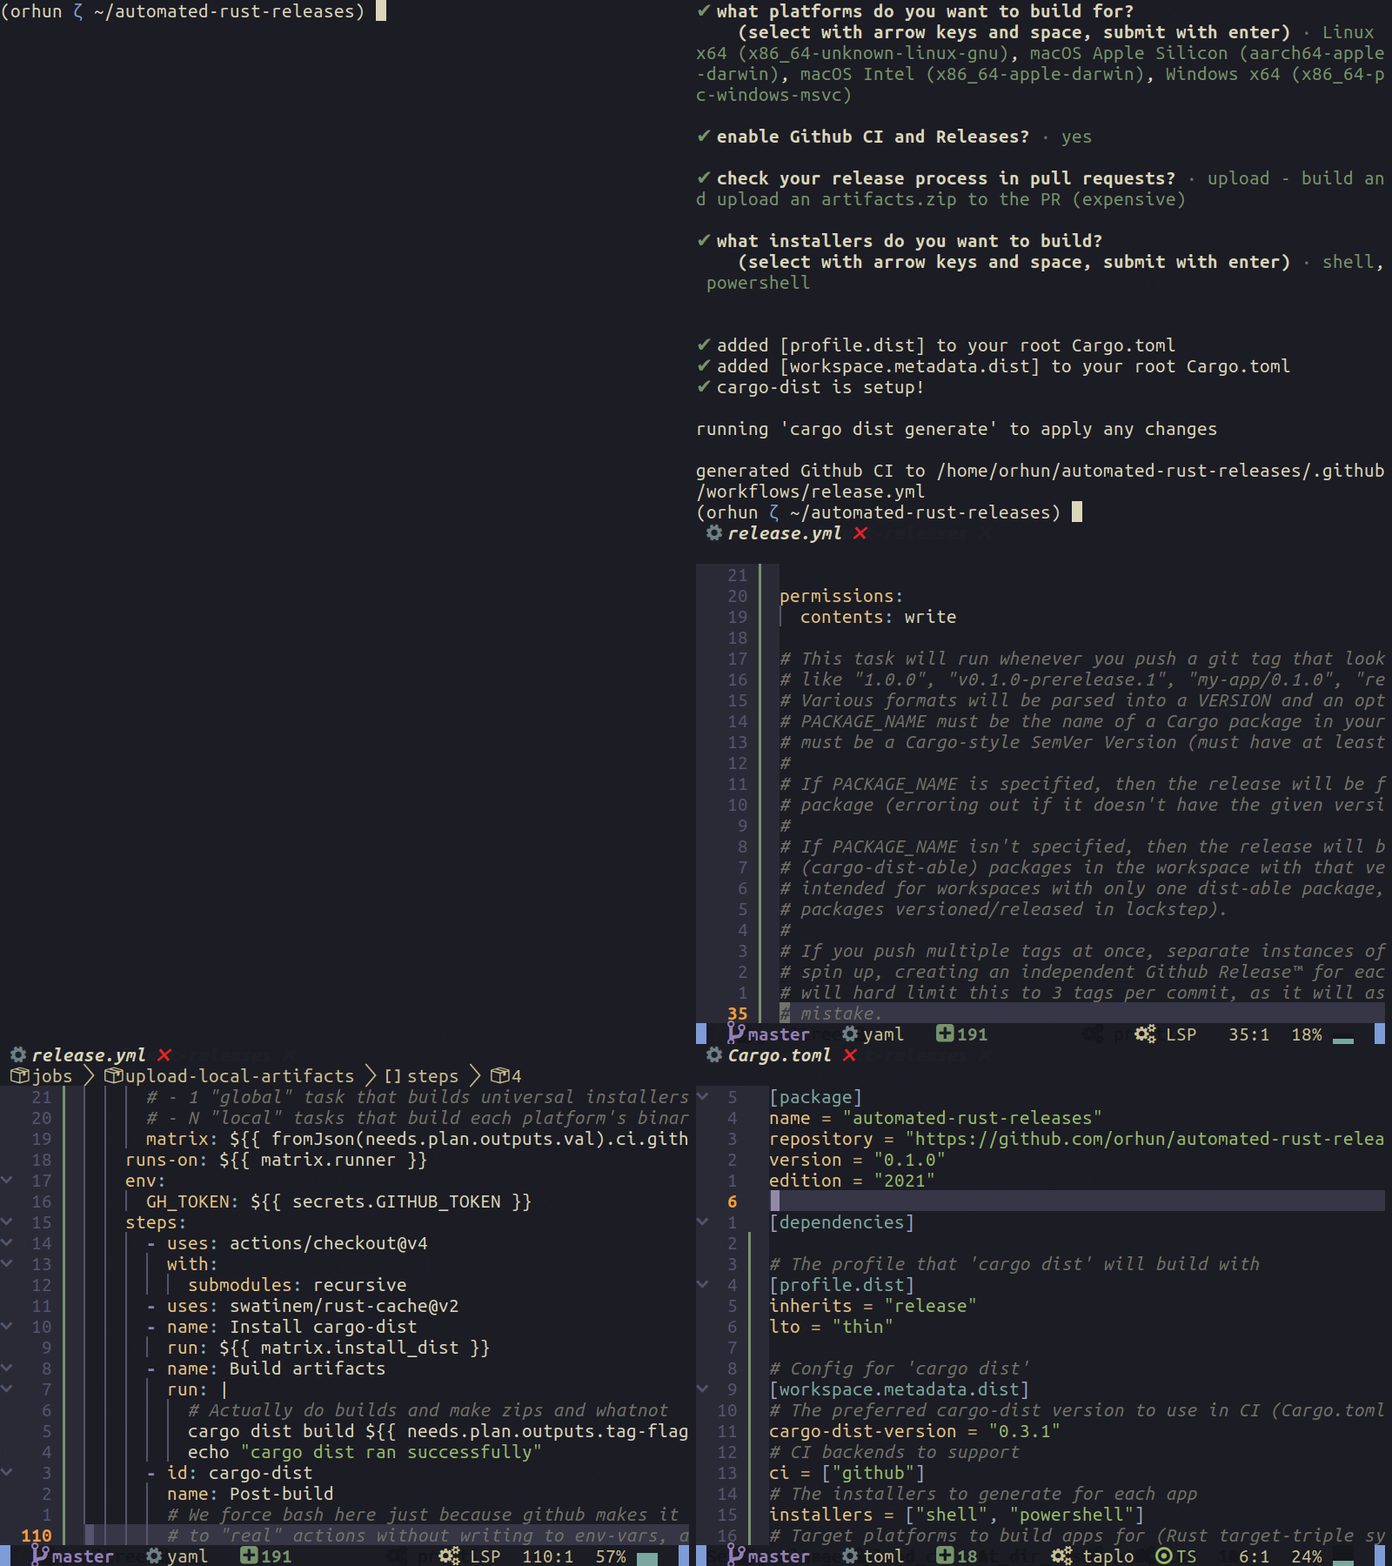
Q: Woah, what happened?
The command above generates .github/workflows/release.yml file for handling the GitHub releases. Also, it adds the following section to your project's Cargo.toml:
# The profile that 'cargo dist' will build with
[profile.dist]
inherits = "release"
lto = "thin"

# Config for 'cargo dist'
[workspace.metadata.dist]
# The preferred cargo-dist version to use in CI (Cargo.toml SemVer syntax)
cargo-dist-version = "0.3.1"

# CI backends to support
ci = ["github"]

# The installers to generate for each app
installers = ["shell", "powershell"]

# Target platforms to build apps for (Rust target-triple syntax)
targets = [
  "x86_64-unknown-linux-gnu",
  "aarch64-apple-darwin",
  "x86_64-apple-darwin",
  "x86_64-pc-windows-msvc",
]

# Publish jobs to run in CI
pr-run-mode = "upload"
You can update this configuration to easily configure cargo-dist and tweak your release settings.
Q: What about new releases/breaking changes of cargo-dist? Do I need to remove the configuration and start over?
A: You can simply run cargo dist init again to re-generate the release configuration!
Q: Cool! Does cargo-dist check if the workflow file is up-to-date? What if I want to make changes to the generated GitHub Actions workflow (such as installing Linux dependencies)?
A: Simply set the following values in the configuration to avoid an "out of date" warning:
[workspace.metadata.dist]

# Ignore out-of-date contents
allow-dirty = ["ci"]Q: How can I test cargo-dist locally?
A: Easy:
$ cargo dist plan

announcing v0.1.0
  automated-rust-releases 0.1.0
    automated-rust-releases-installer.sh
    automated-rust-releases-installer.ps1
    automated-rust-releases-aarch64-apple-darwin.tar.xz
      [bin] automated-rust-releases
      [misc] LICENSE-MIT
      [checksum] automated-rust-releases-aarch64-apple-darwin.tar.xz.sha256
    automated-rust-releases-x86_64-apple-darwin.tar.xz
      [bin] automated-rust-releases
      [misc] LICENSE-MIT
      [checksum] automated-rust-releases-x86_64-apple-darwin.tar.xz.sha256
    automated-rust-releases-x86_64-pc-windows-msvc.zip
      [bin] automated-rust-releases.exe
      [misc] LICENSE-MIT
      [checksum] automated-rust-releases-x86_64-pc-windows-msvc.zip.sha256
    automated-rust-releases-x86_64-unknown-linux-gnu.tar.xz
      [bin] automated-rust-releases
      [misc] LICENSE-MIT
      [checksum] automated-rust-releases-x86_64-unknown-linux-gnu.tar.xz.sha256
And run cargo dist build if you actually want to build the artifacts. Also, if you set pr-run-mode to upload in the configuration, then the artifacts will be built and uploaded as artifacts.zip to the related commit on GitHub.
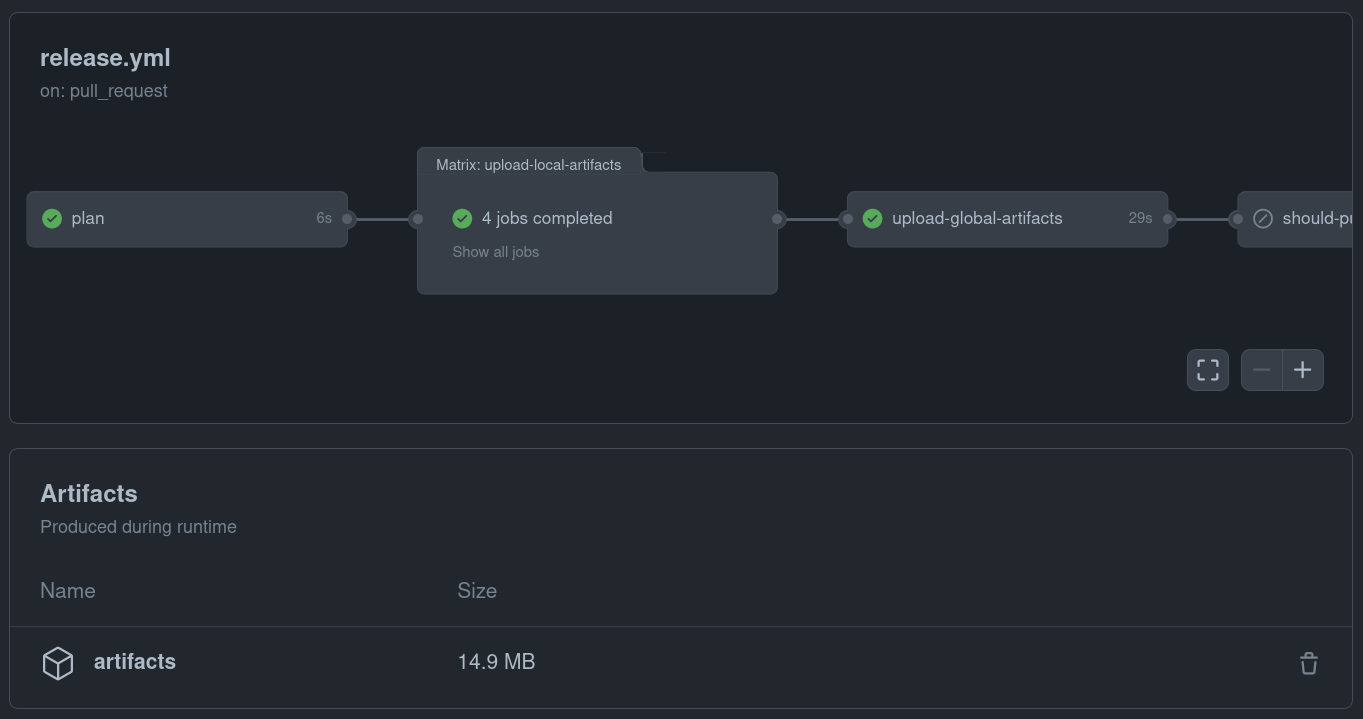
Now we are ready to build artifacts and release them on GitHub! There are a couple of steps left until we create a release and showcase everything.
Dependabot
Dependabot is a tool built into GitHub for automatically updating a project's dependencies via creating pull requests.
We can simply configure it by creating .github/dependabot.yml:
version: 2
updates:
  # Maintain dependencies for Cargo
  - package-ecosystem: cargo
    directory: "/"
    schedule:
      interval: daily
    open-pull-requests-limit: 10

  # Maintain dependencies for GitHub Actions
  - package-ecosystem: github-actions
    directory: "/"
    schedule:
      interval: daily
    open-pull-requests-limit: 10
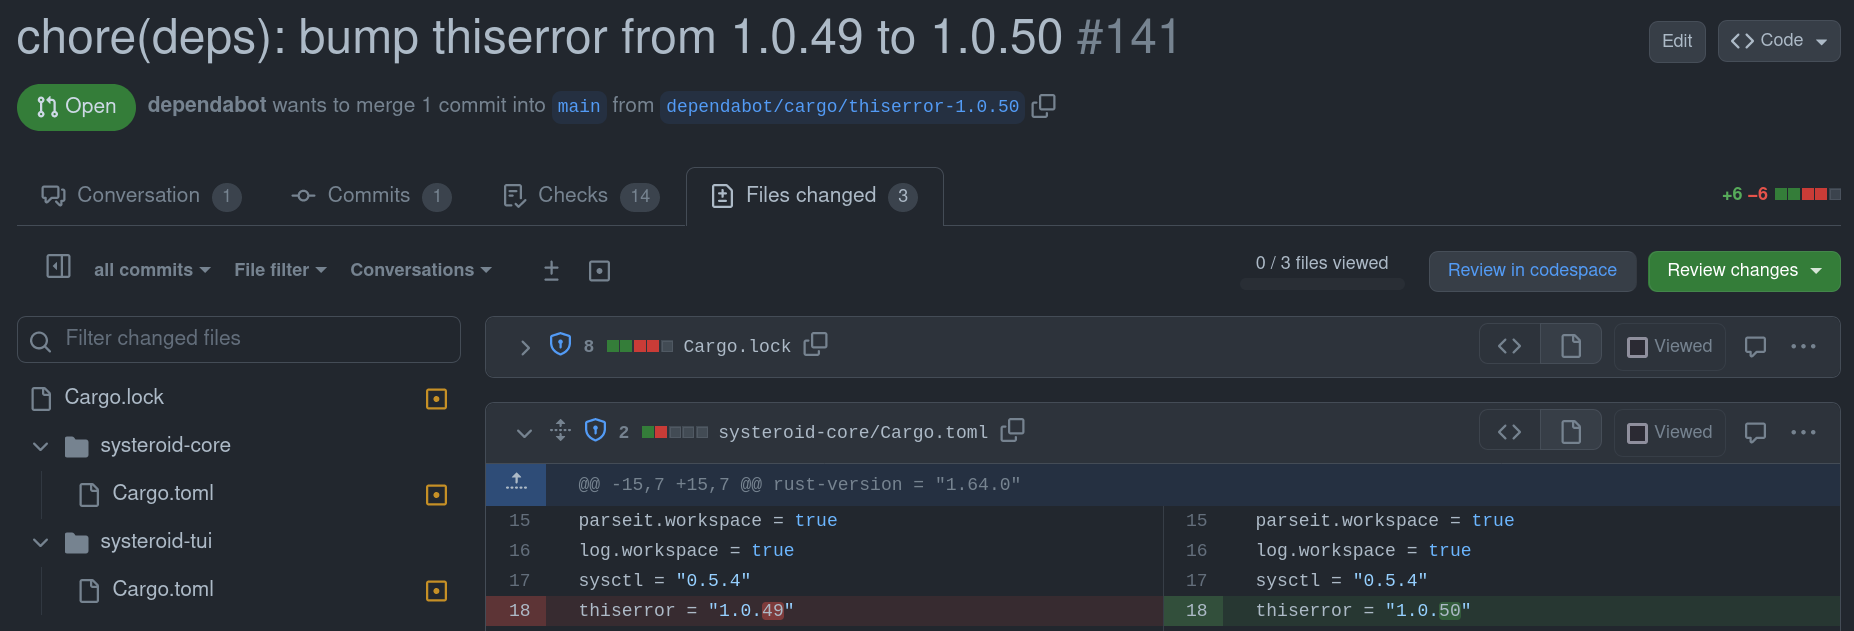
Now Dependabot will start creating pull requests for Rust/GitHub Actions dependencies when they become out-of-date:
Mergify
Mergifyis a CI/CD pipeline optimizer that manages your pull request, automates your GitHub workflow, and optimizes your CI costs.
We will be using Mergify to:
- Automatically merge
Dependabotpull requests. - Update to the latest
mainbranch for pull requests.
Let's create the configuration in .github/mergify.yml:
pull_request_rules:
  - name: Automatic merge for Dependabot pull requests
    conditions:
      - author=dependabot[bot]
    actions:
      merge:
        method: squash

  - name: Automatic update to the main branch for pull requests
    conditions:
      - -conflict # skip PRs with conflicts
      - -draft # skip GH draft PRs
      - -author=dependabot[bot] # skip dependabot PRs
    actions:
      update:
Then, we need to create an account on https://mergify.com, setup GitHub integration (Integrations > GitHub > Configure) and add our repository:

Lastly, we need to enforce a GitHub repository branch protection rule by enabling Require status checks to pass and adding a check for Mergify Merge Protections (see the Mergify documentation).
Now Mergify will start to process the open pull requests:
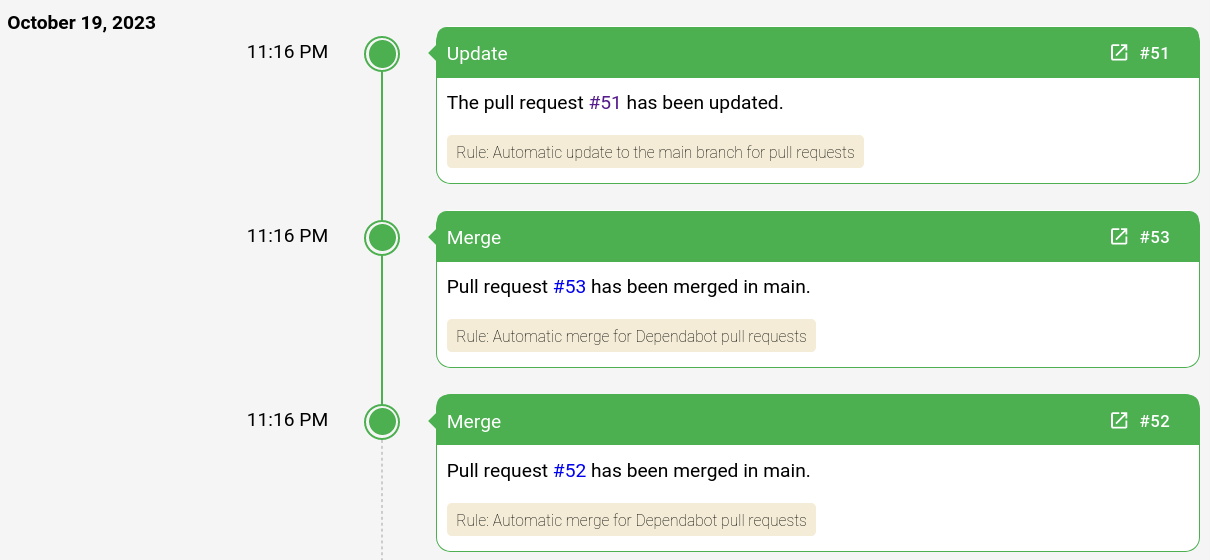
The Dependabot pull requests are now merged automatically! 🎉
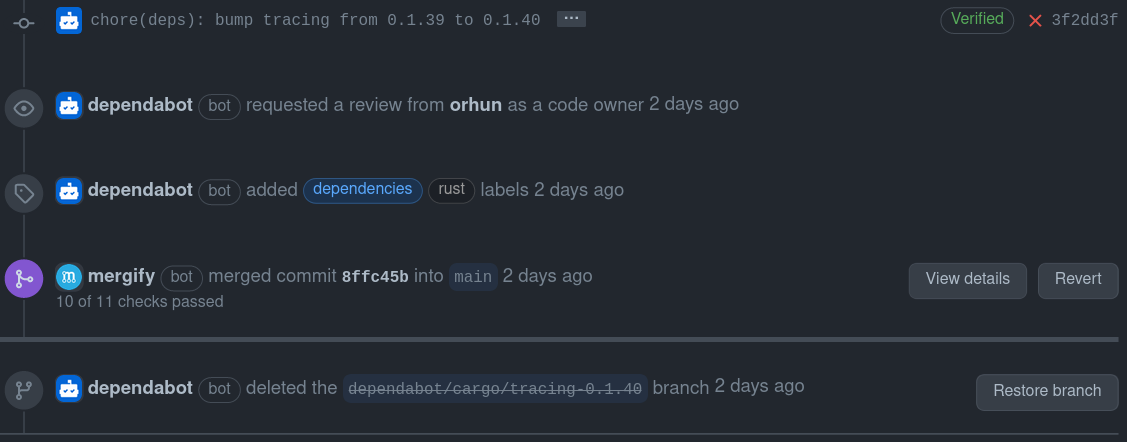
Let's Create Releases 🚀
All the code/configuration is available here: https://github.com/orhun/automated-rust-releases
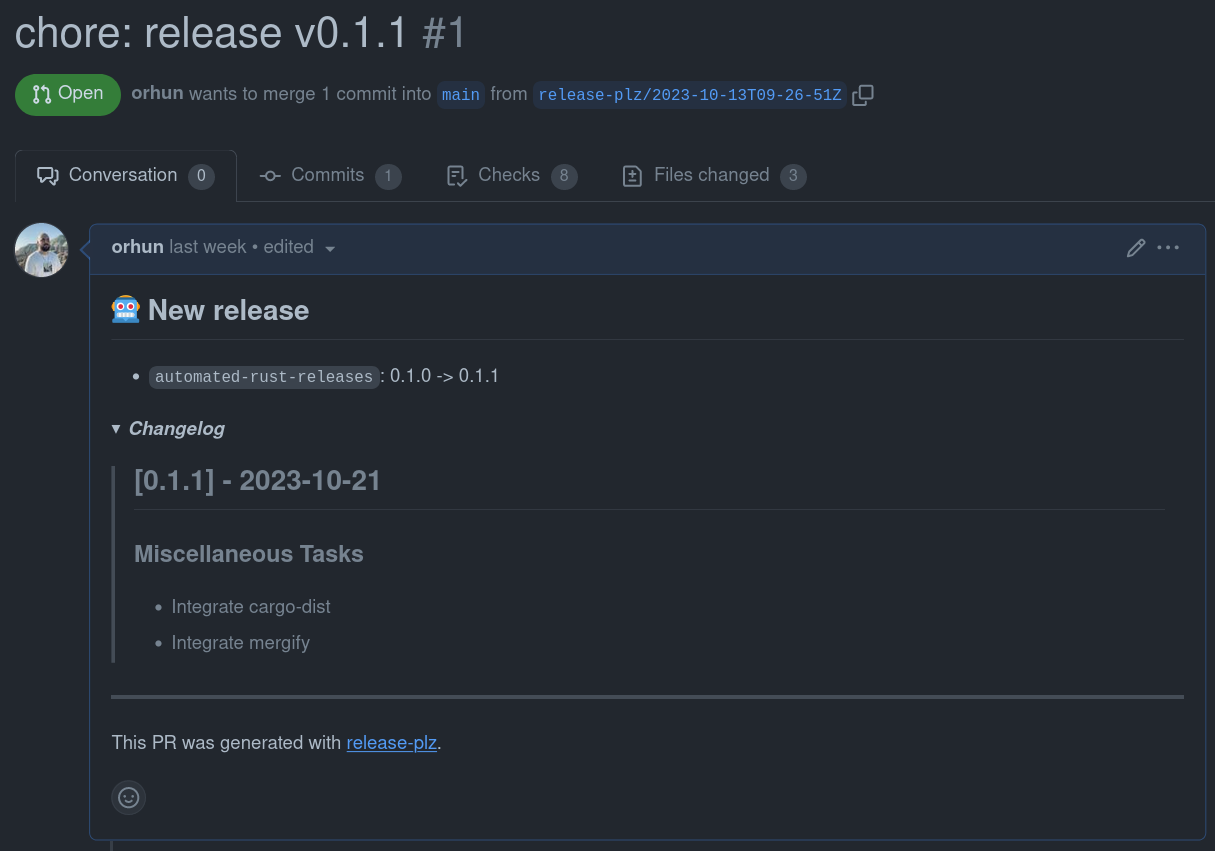
release-plz already created a PR for us:
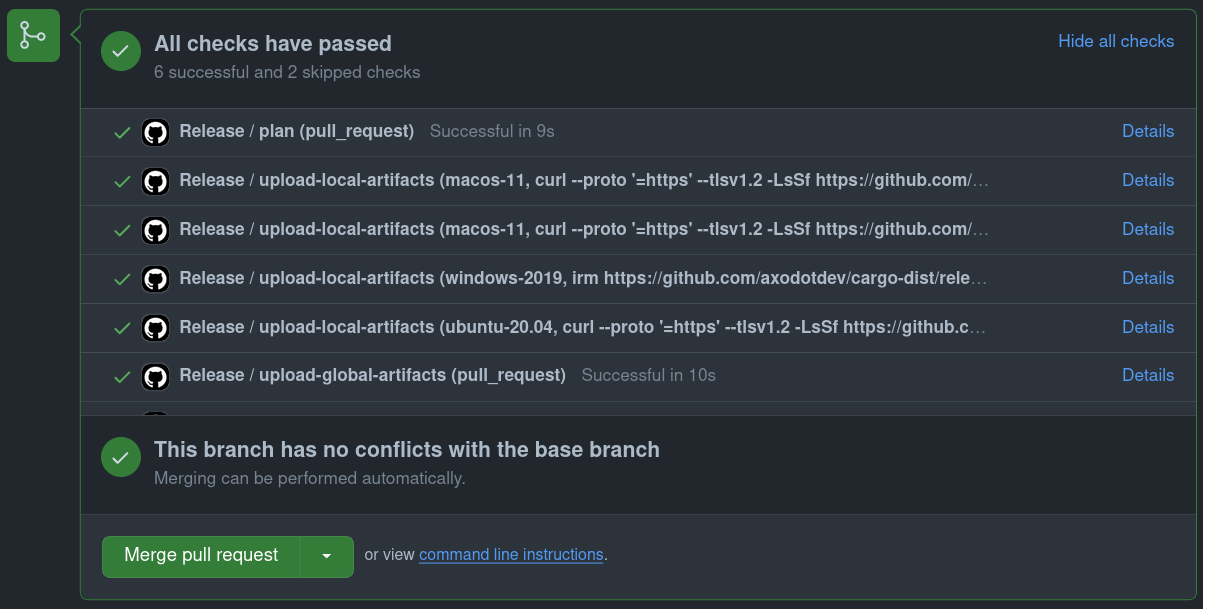
cargo-dist checks also pass. Let's click merge and create a release:
After the merge, release-plz picks up the new version from Cargo.toml and pushes the new version to crates.io:
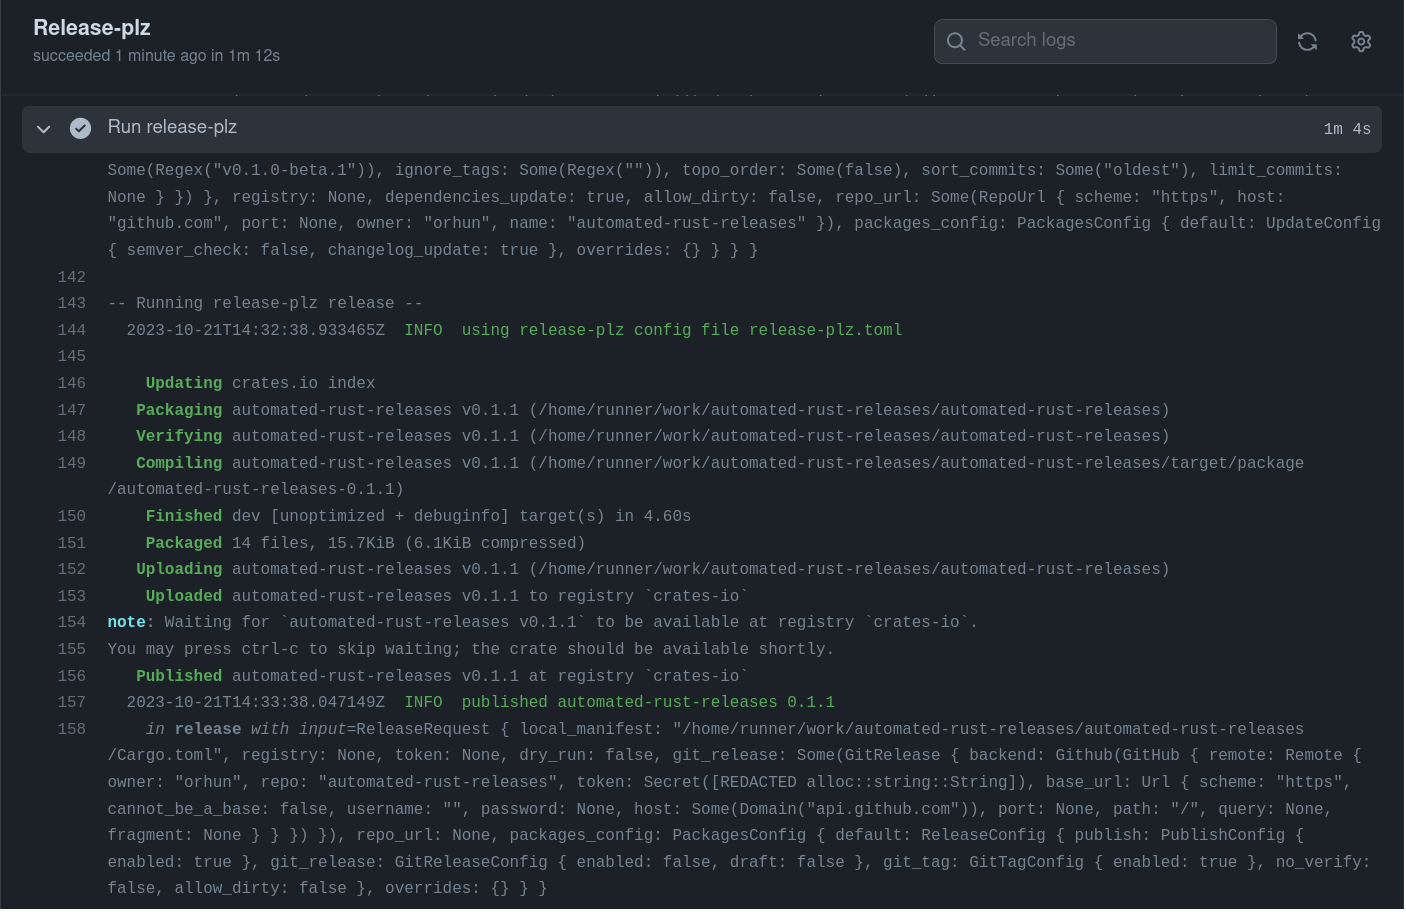
release-plz also creates a new tag which triggers cargo-dist:
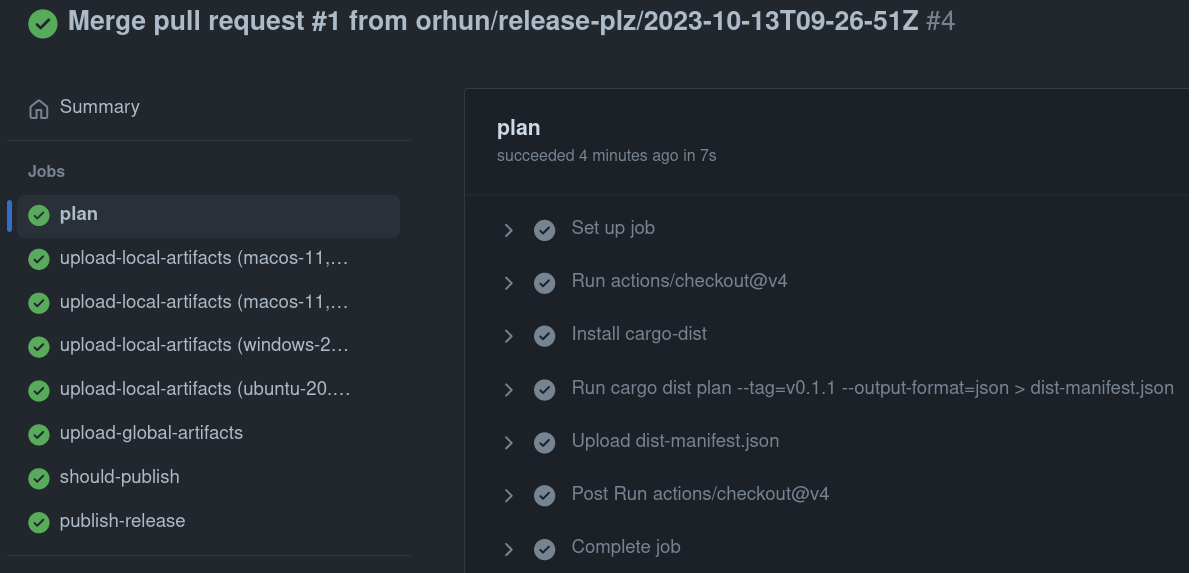
cargo-dist builds the artifacts and uploads them to the GitHub release:
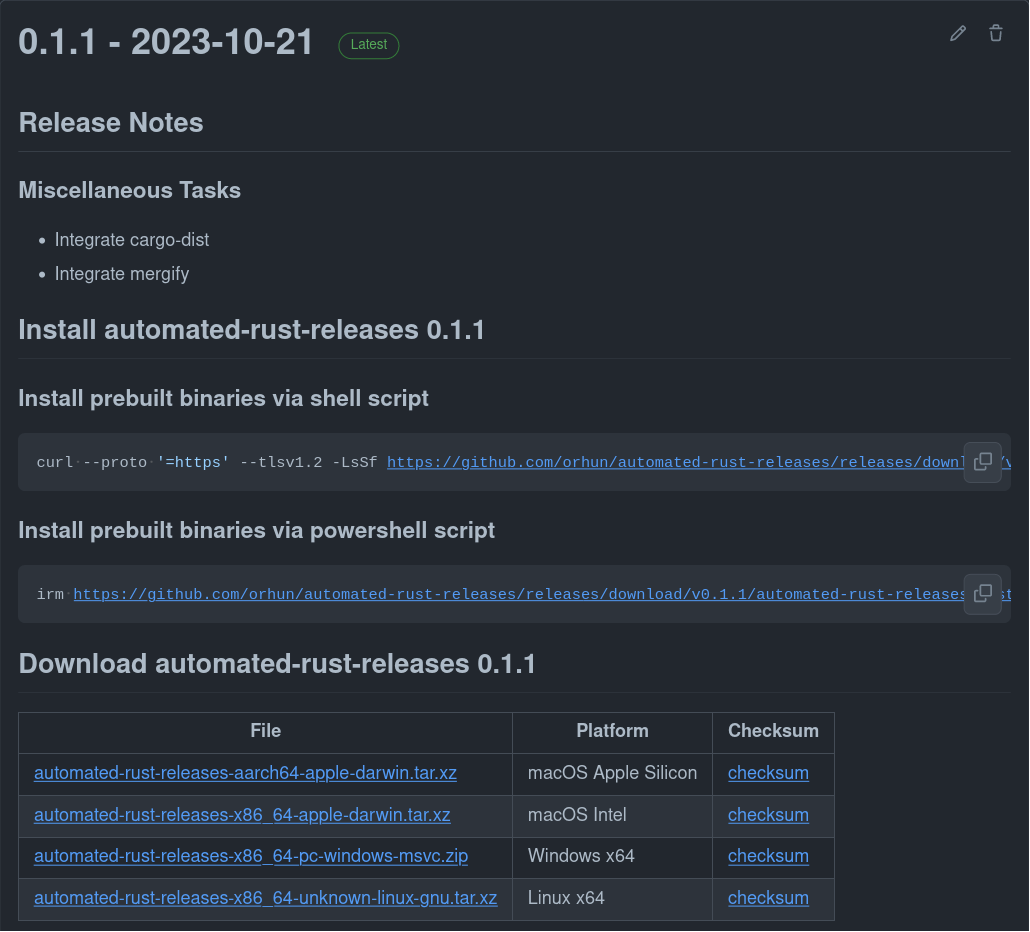
https://github.com/orhun/automated-rust-releases/releases/tag/v0.1.1
As you can see cargo-dist also parses the changelog (which is generated by git-cliff) and adds it to the release. (Please note that you actually need to create CHANGELOG.md file at the root of your repository for this to work.)
Let's try out the installer for the heck of it:
$ curl --proto '=https' --tlsv1.2 -LsSf https://github.com/orhun/automated-rust-releases/releases/download/v0.1.1/automated-rust-releases-installer.sh | sh

downloading automated-rust-releases 0.1.1 x86_64-unknown-linux-gnu
installing to /home/orhun/.cargo/bin
  automated-rust-releases
everything's installed!
And when we run it:
$ automated-rust-releases

Hello, world!
Beautiful!
Conclusion 🤔
I used this release automation for my latest project daktilo (a CLI program to turn your keyboard into a typewriter) and I'm pretty satisfied with it so far. The only thing I'm waiting for is the following improvements:
git-cliff: better GitHub integration (i.e. adding contributor names to the changelogs *)release-plz: setting the version in the release PR with a command *cargo-dist: cross compilation *
Let me know if you have suggestions and ideas!
Happy releasing! 🦀
houdoe!
💖 Liked this article? Want to sponsor my blog posts and have early access? Want to add your company's badge / your logo here? Check out my GitHub sponsorship tiers!